ADA
Friday, July 1st, 2022
July 2022: Inspector’s Corner
I do ADA inspections every Wednesday and I always find some interesting things that I wanted to share. Here are some interesting solutions and products that are good for accessibility, and I will show them in this newsletter.
Diaper Changing Counters and Cane Detection
A diaper changing counter will sometimes be located in a circulation path around the restroom and when it is left open it can be a protruding object. TDLR issued a technical memo on the topic. Here is the link. At some of my inspections I have seen some interesting ways of handling this:
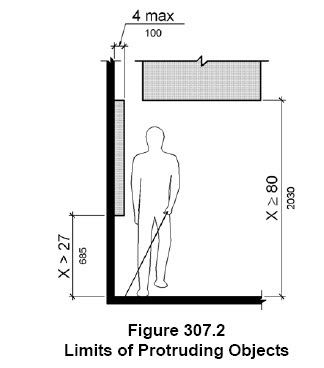
The figure above shows the requirements for objects mounted in a circulation path so they will not be hazards for people with visual impairments.
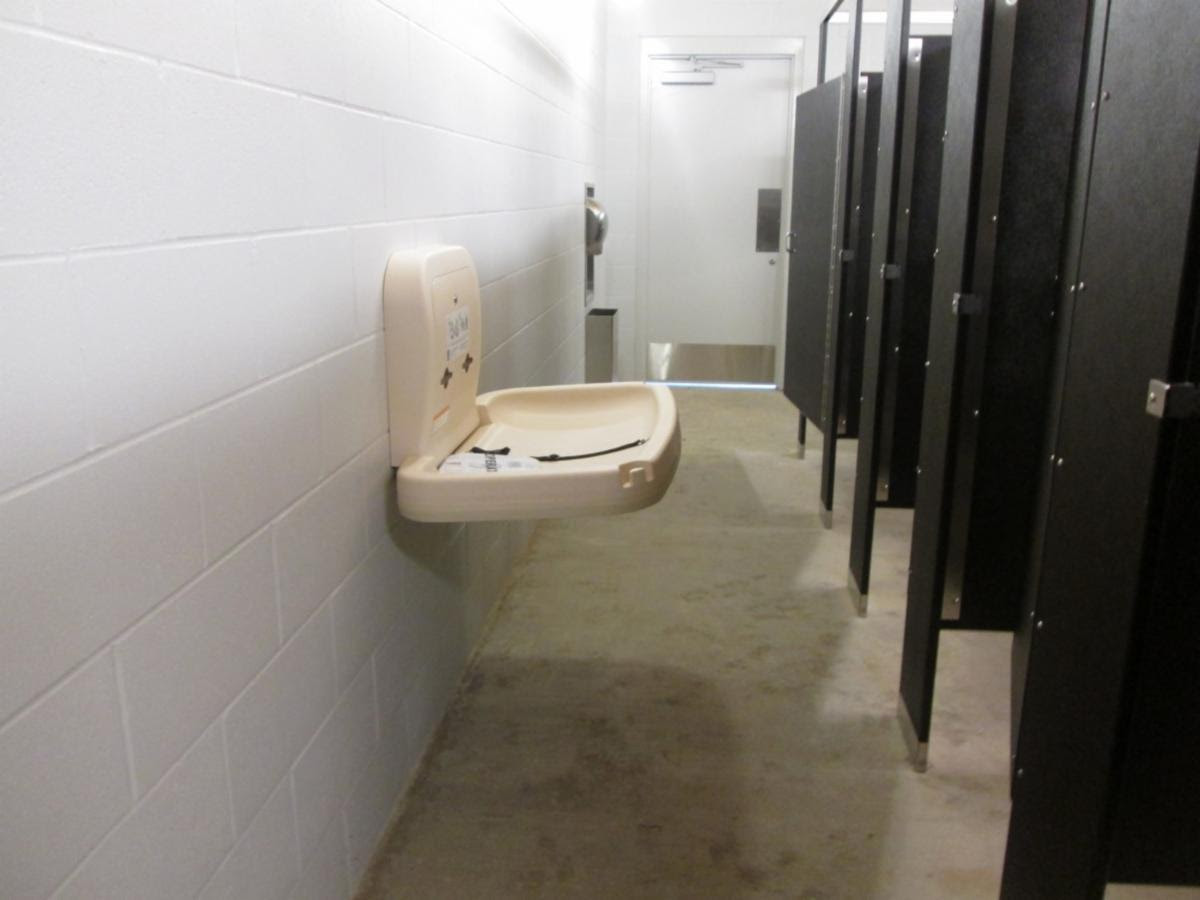
The photo above shows a diaper changing counter in the open position and located on the circulation path to the toilet compartments and exit door and is a protruding object.
Recently I have seen this Koala diaper counter installed. What is unique and interesting about it is that they are taking into consideration the “protruding object” concern and they have designed it so that the handle you use to open it, once it is in the down position, acts as cane detection.
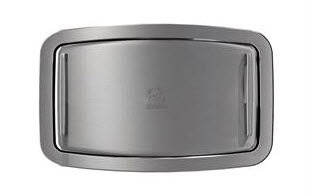
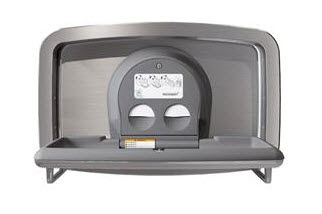
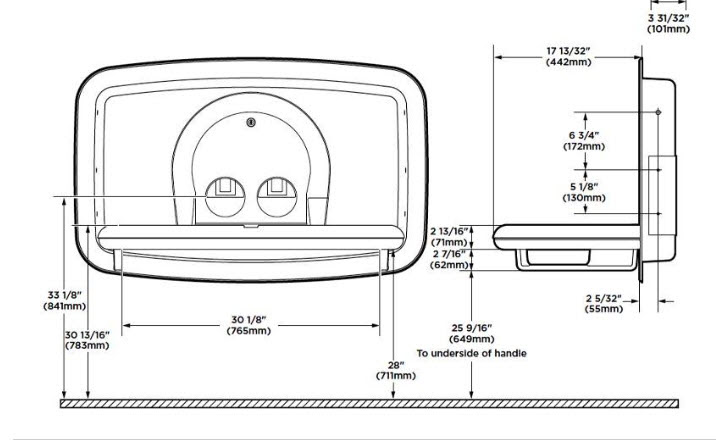
This diaper counter’s handles will reach below 27″ a.f.f. if installed correctly and it acts as cane detection.
Reflective Surface at Mirrors
Most of us understand the rule about mirrors over lavatories or sinks. They must be located so that the reflective surface is not higher than 40″ a.f.f. I was recently at an inspection where the mirror had a frame as part of the mirror where the outer edge was the reflective surface, then frosted glass and back to the reflective surface. Obviously, the intent was for a person in a wheelchair to be able to see themselves in the mirror, so although technically there is a reflective surface at 40″ a.f.f., the real “mirror” was above that.

The mirror in the picture above has a frosted glass frame that has an outer edge made of the reflective surface of the mirror.
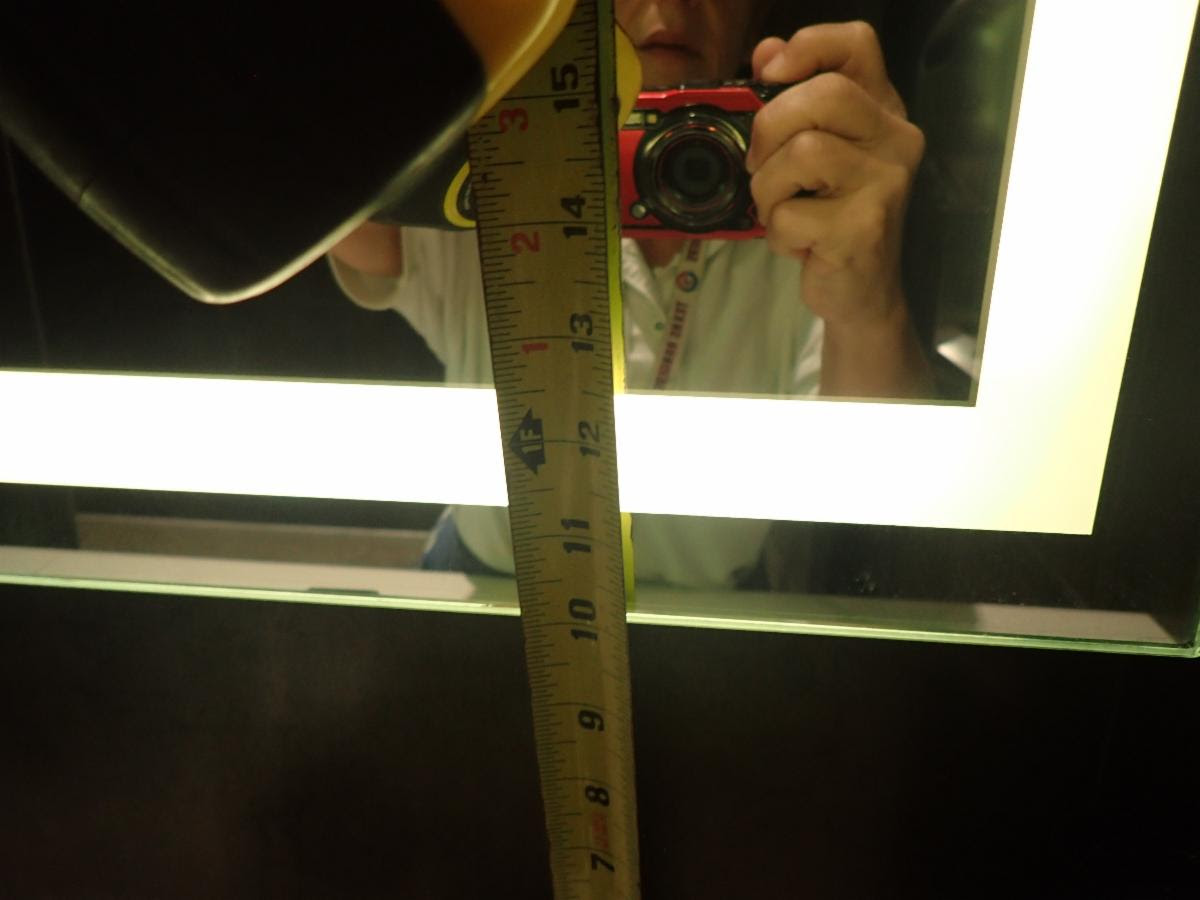
The “reflective” surface of the mirror (as the Standards intended) will be the one above the frosted glass, even though there is a reflective surface below the frosted glass.
Call for Entries: Click here for more information
Need Barrier-Free CEUs? On Demand Online courses:
We offer live online courses as well. If you are interested, please contact our office.
Visit our Resource Page that we are building to give you guidance on products and services
If you would like a private class for your office, contact us and we can schedule one in person or virtual.
If you want to learn more about these standards, be sure to check out my books:”The ADA Companion Guide” “Applying the ADA” published by Wiley.
Subscribe to our YouTube Channel
Follow us on LinkedIn
Join our group on LinkedIn
Like our Page on Facebook
Monday, January 4th, 2021
Where are accessible benches required?
Compliance with ADA Section 903 (Benches) shall be required only when specifically referenced in the 2010 ADA Standards for Accessible Design. This also applies to Texas 2012 Texas Accessibility Standards. There is no specific scoping for benches, except when they are required in the the different sections of the ADA Standards. Because the ADA Standards only deals with fixed or built in elements, benches must be fixed or built in as well.
Benches complying with section 903 are only required at the following spaces:
- Saunas (per section 612)
- Locker Rooms (per section 803)
- Dressing Rooms (per section 803)
- Fitting Rooms (per section 803)
- Holding Cells (807)
And all those benches must follow the requirements in section 903:
903.2 A Clear Floor or Ground Space next to the short axis.
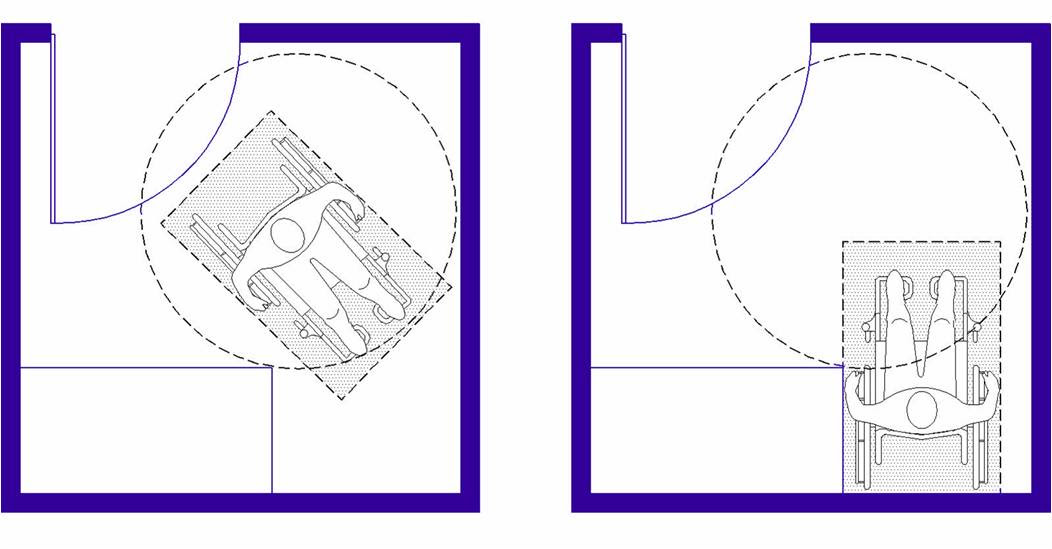
The bench shown in the figure above is inside a dressing room which requires that the bench have back support as well as the 30″x48″ clearance parallel with the short axis of the bench
903.3 Size should be 42″ long and between 20″ and 24″ deep
903.4 Back Support.
903.5 Height should be 17″-19″
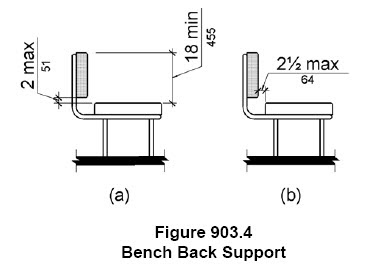
903.6 will holds 250 lbs
903.7 at Wet Locations the seat shall be slip resistant and does not accumulate water.
Saunas and Steam Rooms ADA 612.2
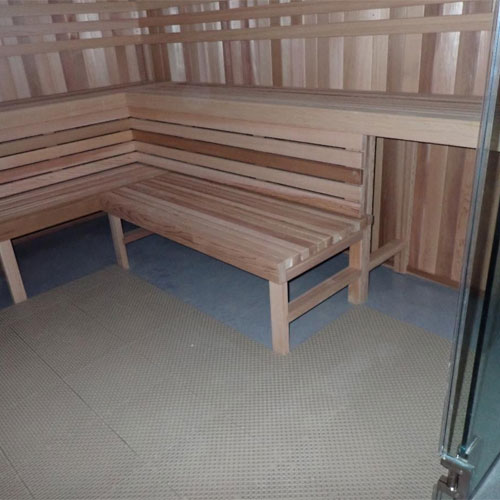
The sauna has a bench with back support, the proper length of 42″ and depth of 24″ with a 30″ x 48″ space next to its short axis
Dressing, Fitting, and Locker Rooms ADA 803.4
Dressing rooms are typically private rooms in doctor’s offices, imaging centers etc. which are provided for the purpose of changing out of clothes and into other garments
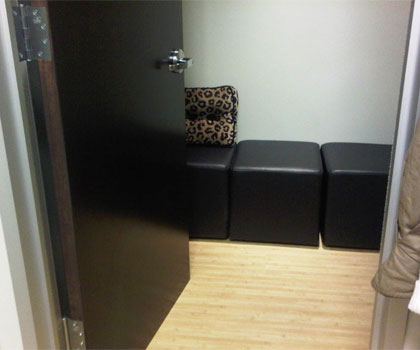
This dressing room does not have a compliant bench because the bench is movable, the door swings into it and no 30″ next to its short axis .
Fitting rooms are private rooms provided at retail stores for the purpose of trying on clothing for purchase.
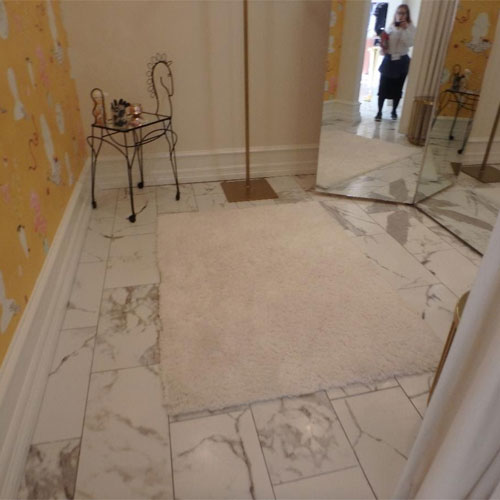
This dressing room does not have a compliant bench in the room.

This fitting room does not have a compliant bench because it doesn’t have a 30″ space next to the short axis
Locker rooms are also considered “dressing rooms” if the lockers are used to keep uniforms or clothing like at a gym or a medical building where people will change into clothes for a specific purpose.
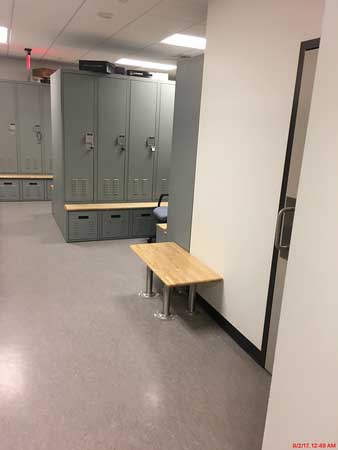
This bench is located up against the wall in a locker room and therefore has back support. Note that the 30″x48″ clear floor space is in front of the door which (although not recommended) it is allowed

This locker room does not have a compliant bench. It lacks back support and it is not a minimum of 20″ deep.
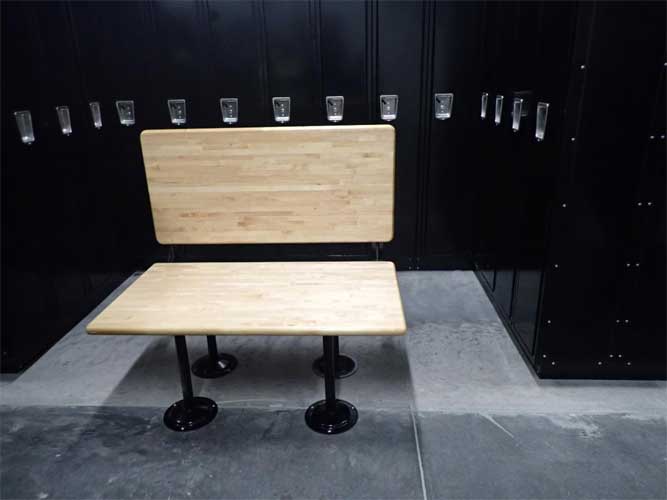
This is a bench that is not up against the wall so back support per figure 903.4 was provided, but they did not provide the 30″ x 48″ space next to the short axis. The lockers were in the way reducing the clearance to 21″ (see next photo)
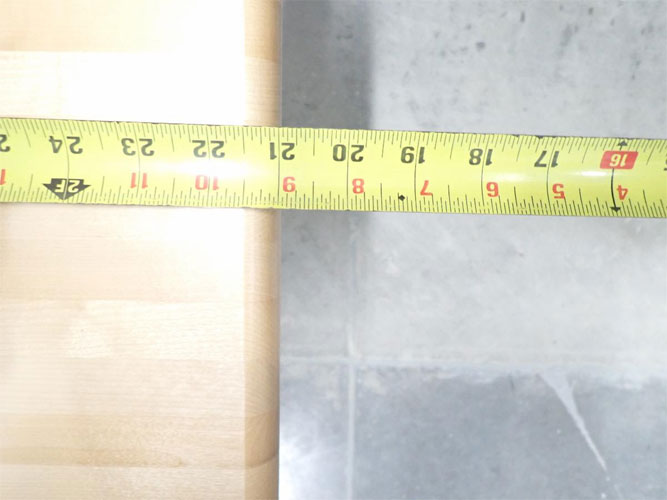
This photo is the dimension of 21″ between the edge of the bench and the edge of the lockers next to it. The clearance should have been 30″ minimum
Holding Cells and Housing Cells ADA 807.2.2
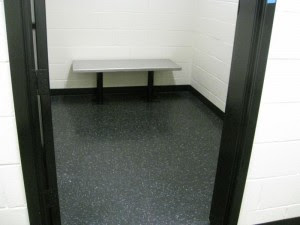
This holding cell has a bench with back support, but it does not have a 30″ clearance next to the short side.
Other Bench locations
There may be other locations where benches are used. If a fixed bench is provided in other spaces besides the ones specifically listed in the Standards, they do not have to comply with section 903. Below are other locations where benches may be provided, but do not have to comply with the standards or be on an accessible route.
Benches on the exterior
What about fixed or built in benches at courtyards, amphitheaters or or even at parks? If they are part of an assembly area (with four or more benches for the use of an audience or seating for spectators) then it would have to comply only with assembly seating per section 221 and 802.
Otherwise, these benches are not scoped and do not have to comply with the requirements in section 903.

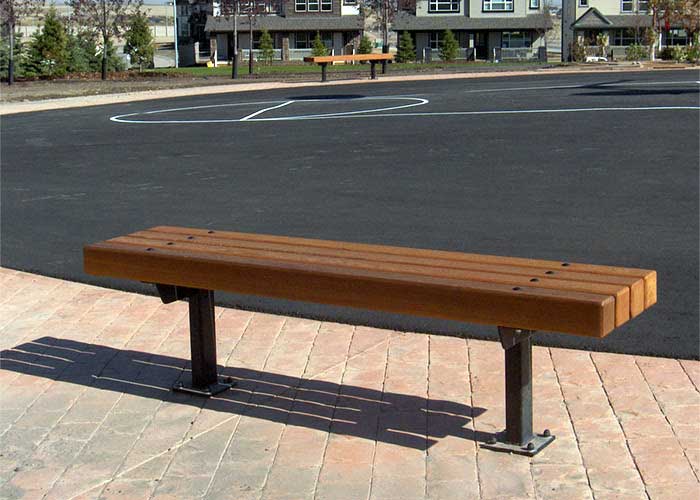
The benches shown in the photos above are located in a park. These benches are not required to comply. Even the one at the basketball court is not considered assembly seating unless there are four or more and meant to be part of the spectator seating.
Benches at shower rooms
Shower rooms often have benches, but those are not required to comply because a shower room is not technically a “dressing” room even though dressing and undressing might occur inside.
Benches are different than shower seats. The photo below shows a shower with a bench but no seat.
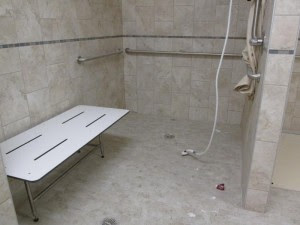
The bench shown in the photos above are located in a shower room. It is not inside the shower and therefore not considered a shower seat. Benches are not required in shower rooms and therefore do not have to comply with the Standards.
Bus stops also might have a bench
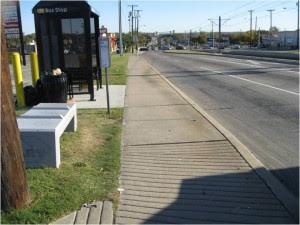
The bench adjacent to the bus stop and the one located inside the bus stop are not required to comply with either section 903 or section 802.
ADA only requires compliance in dressing rooms, fitting rooms, locker rooms, saunas, and holding cells. The spaces shown above are not required to provide a bench, therefore if a bench is provided it will not have to comply.
TDLR has a Technical Memo that explains this fact.
Tuesday, December 1st, 2020
Introduction
The Coronavirus Covid-19 does not seem to be going away any time soon. Architects and designers as well as facility managers are getting creative on how to use the built environment in a safe way in order to keep the virus from spreading. This newsletter will cover a few solutions that we have seen and how this affects persons with disabilities
Touchless plumbing fixtures
One of the best ways to not spread the virus is to not touch anything. And with that in mind, we already see the use of automatic faucets, flush controls and paper towel dispensers is increasing. Those work great not only for preventing the spread of the virus but also for persons who do not have the use of their hands. The one thing to keep in mind with these is the reach range.
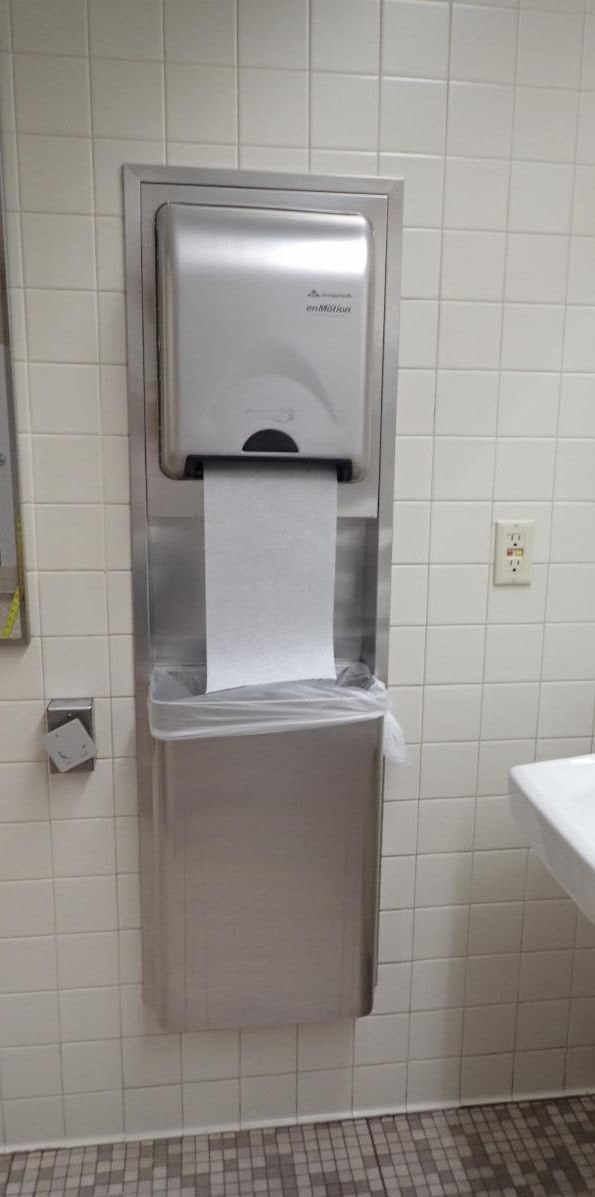
the paper towel dispenser with a touchless sensor shown above is a great solution for touchless fixtures. The sensor should be mounted no higher than 48″ a.f.f.
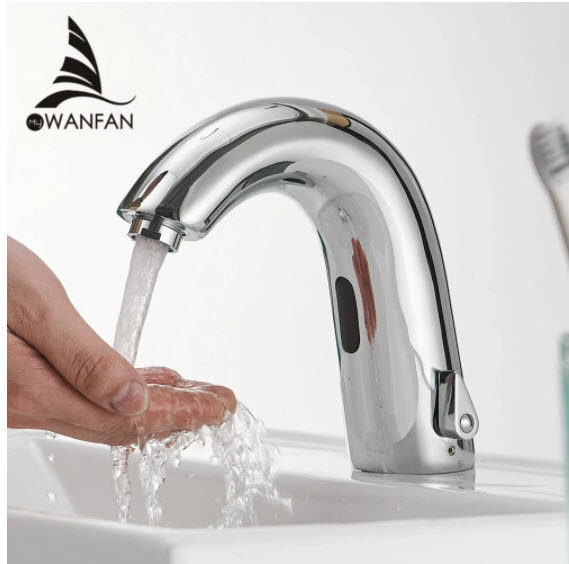
the automatic faucet is also a good solution to avoid touching faucet controls. The sensor should be located no farther than 24″ from the edge. Also keep in mind to have the same amount of floor space below as the reach required.
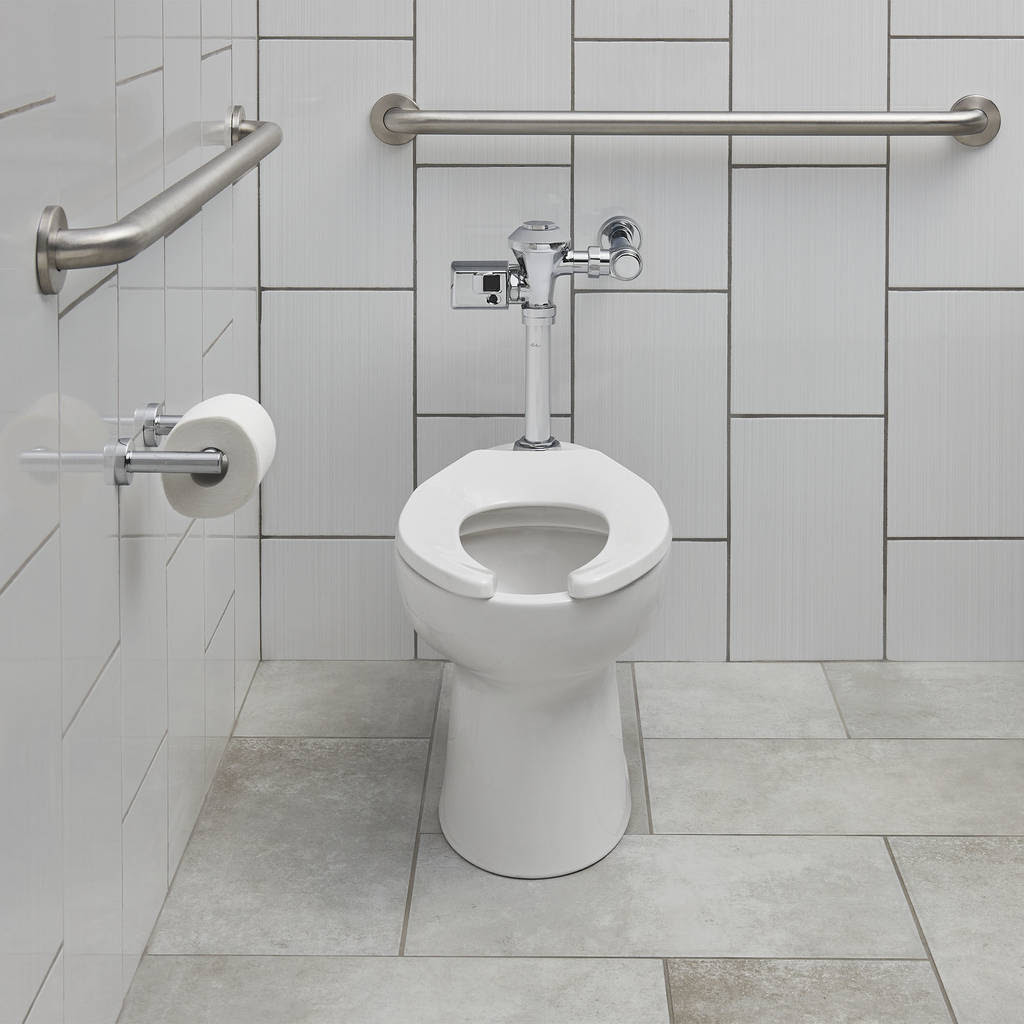
Automatic flush controls are easy to install and flush both urinals and toilets automatically in commercial restrooms providing a more hygienic experience for restroom patrons. Automatic flush controls are available in retrofit that can be installed in the original flush valve. One thing to keep in mind when installing them is that if the unit has a courtesy manual flush it must be installed on the transfer side of the toilet.
Touchless Doors
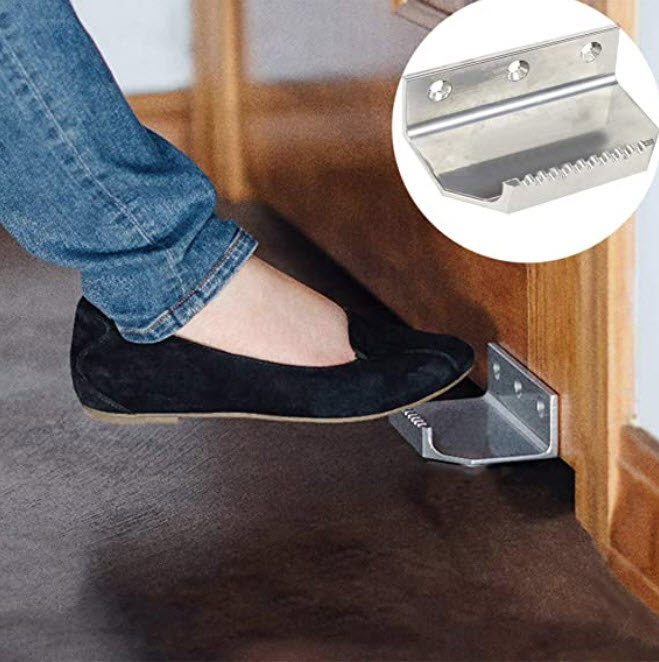
Doors that are not automatic and require pulling of the hardware to open can be a place where Covid-19 is spread. A new device that is allowing people to open the door with their feet has been getting installed. This device is not for persons with disabilities and it can only be installed on the pull side of a door where the 12″ high smooth surface is not required.
Drinking Fountains
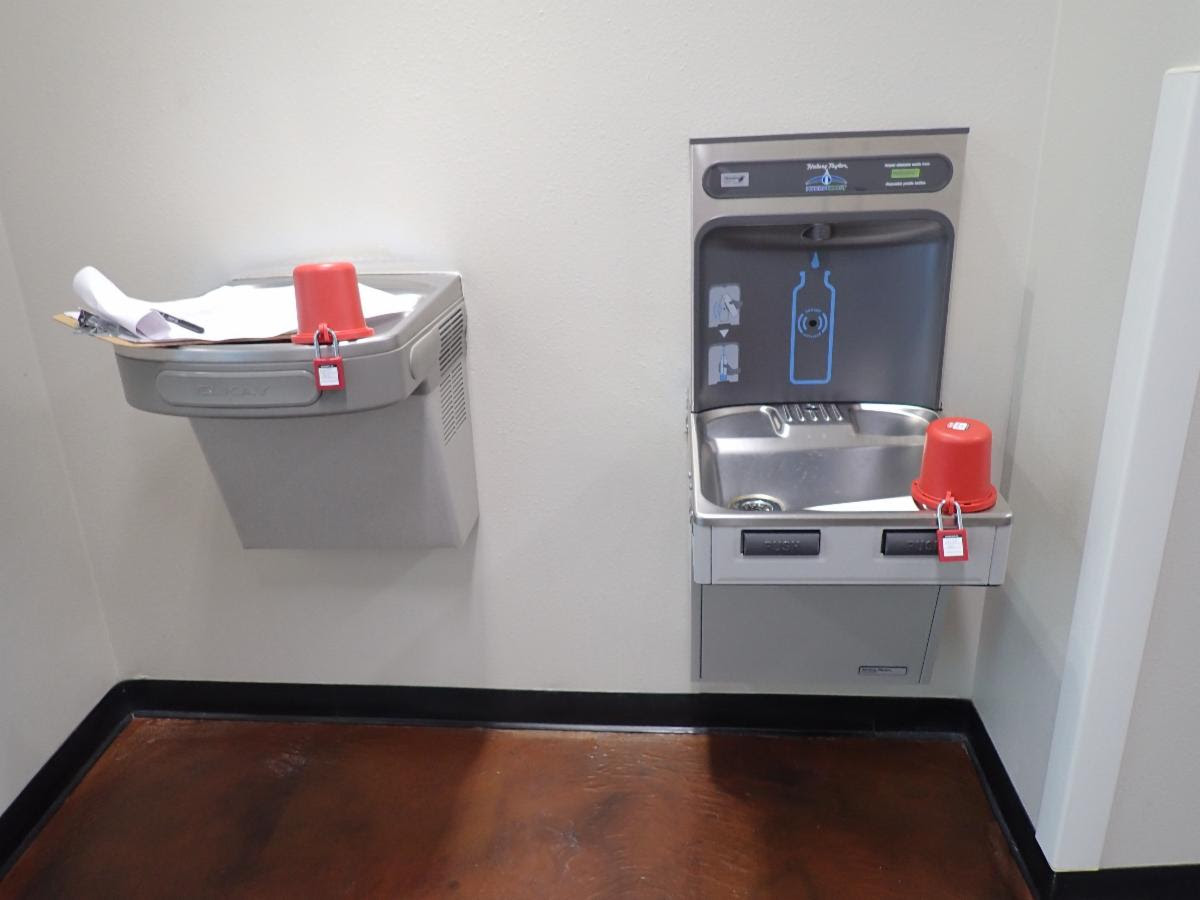
Drinking fountains are one fixture that has been found to be a hazard for spreading the virus. Most of the drinking fountains in buildings have been taken out of commission temporarily. But bottle fillers that are more hygienic and do not have direct contact with germs are a good solution.
The photo below shows the spouts of the drinking fountains covered as to avoid persons from using them. But the bottle filler is still available.
What is next…
We are all looking forward to soon being able to get back to normal…but in a safer, cleaner way. As architects and designers it is important to continue to make our built environment not only more inclusive but also healthier and safer for all.
Monday, November 2nd, 2020
Introduction
When we design for children, there are sections of the 2010 ADA Standards and 2012 TAS which gives us requirements and ranges for locations and heights at water closets and its components. They also provided a handy chart that gives us more specific recommendations when designing for specific age groups. But what is often misunderstood is that the chart is only an “Advisory” and not the actual requirements. If we follow the chart exactly, there may be some conflicts with other elements. This newsletter will explain those conflicts and how we can avoid them as we design.
The chart provided in section 604.9 gives us ranges based on different age groups. But in reality, the requirements are located in the text of the sections, as we will see in more detail.
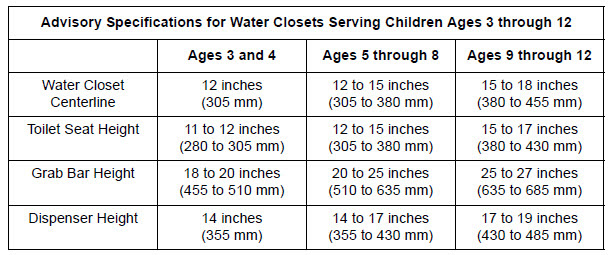
Let’s take one requirement at a time. If you are designing for children, ADA Section 604.9.1 tells us where to locate the water closet:
604.9.1 Location. The water closet shall be located with a wall or partition to the rear and to one side. The centerline of the water closet shall be 12 inches (305 mm) minimum and 18 inches (455 mm) maximum from the side wall or partition,…
We can either use the ranges provided in the section, or we can use the ranges provided in the chart. If we use the chart, some clearances between elements will be difficult to achieve. It might take custom grab bars for example in order to make all the requirements work together.
For example, the location of the water closet for 3-4 year olds. The chart states that it needs to be located at 12″ from the side wall. But also the location of the rear wall grab bar is required to be located 12″ from the centerline of the toilet to the inner edge of the grab bar. This might be an issue because both of the elements must be located at 12″ and the grab bar may not have enough room.
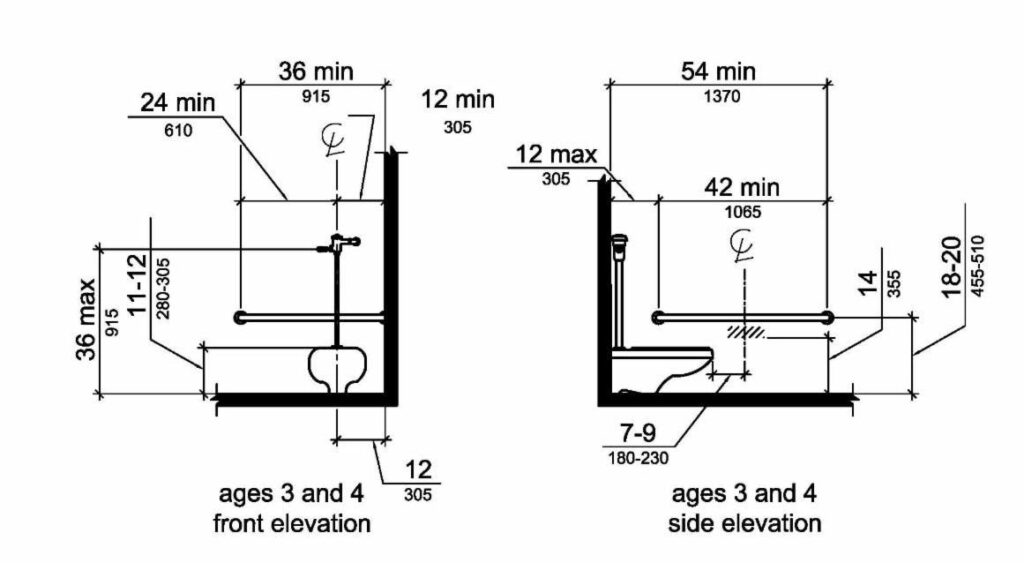
The figure above shows the advisory dimensions that are recommended for children between 3 and 4 years of age. The location of the water closet and the location of the rear wall grab bar may not be able to be located exactly at 12″ from the centerline of the water closet to the side wall.
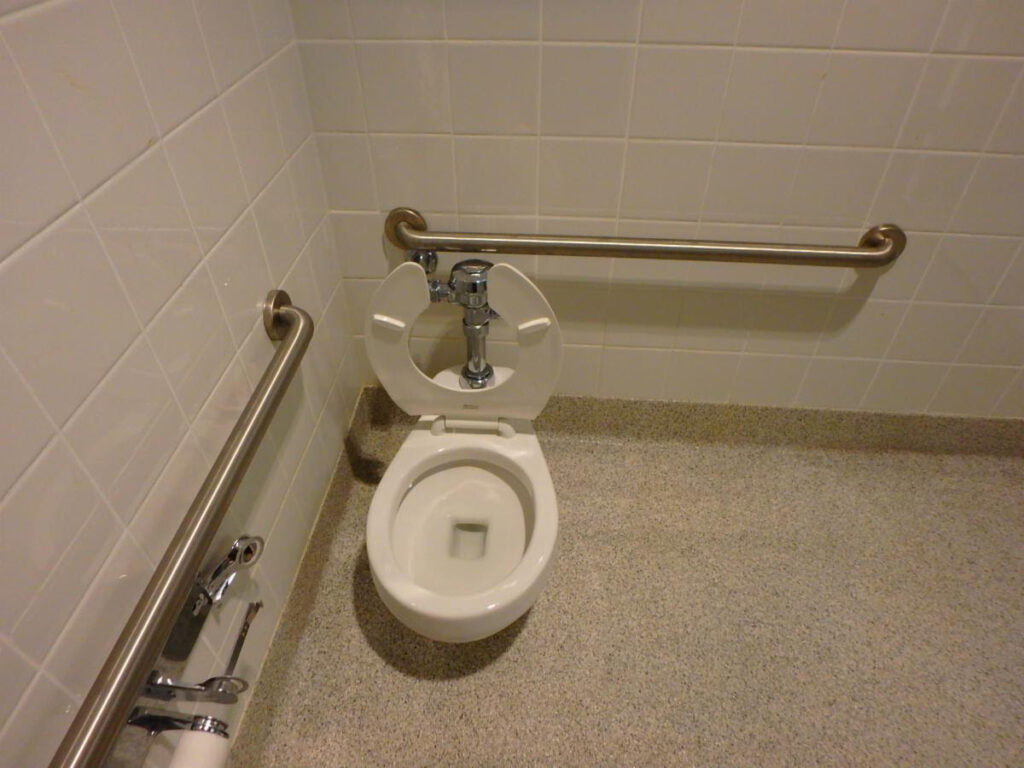
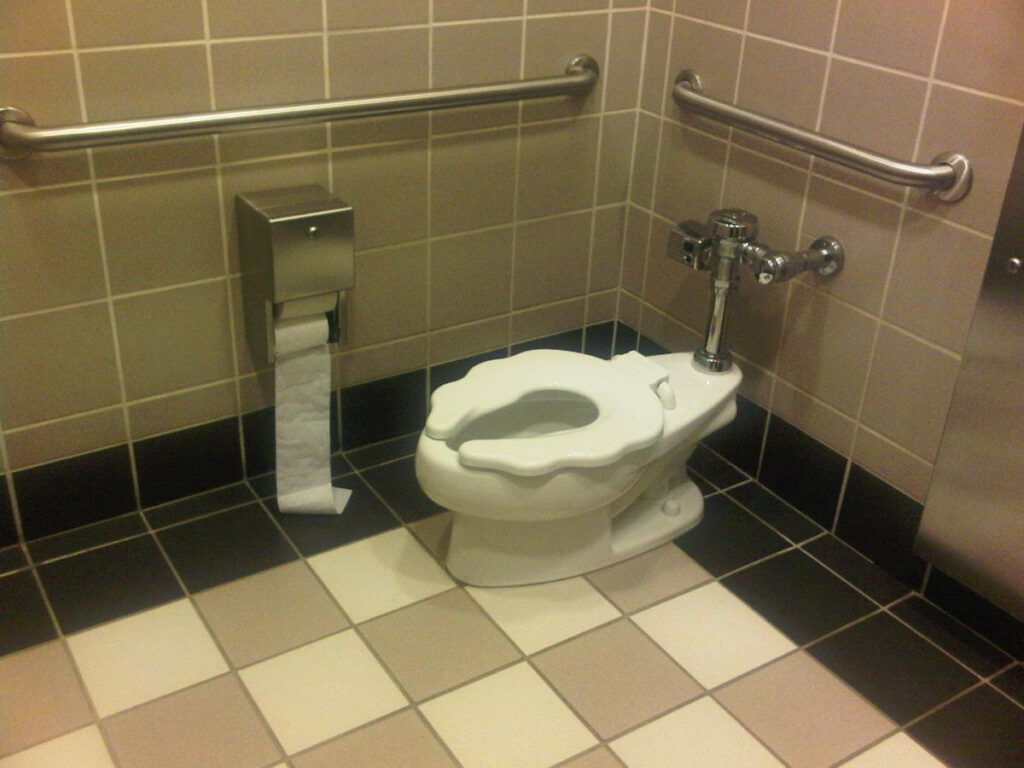
The photo above shows the clearances from the chart. The water closet was located exactly at 12″ from the side wall to the centerline of the water closet.
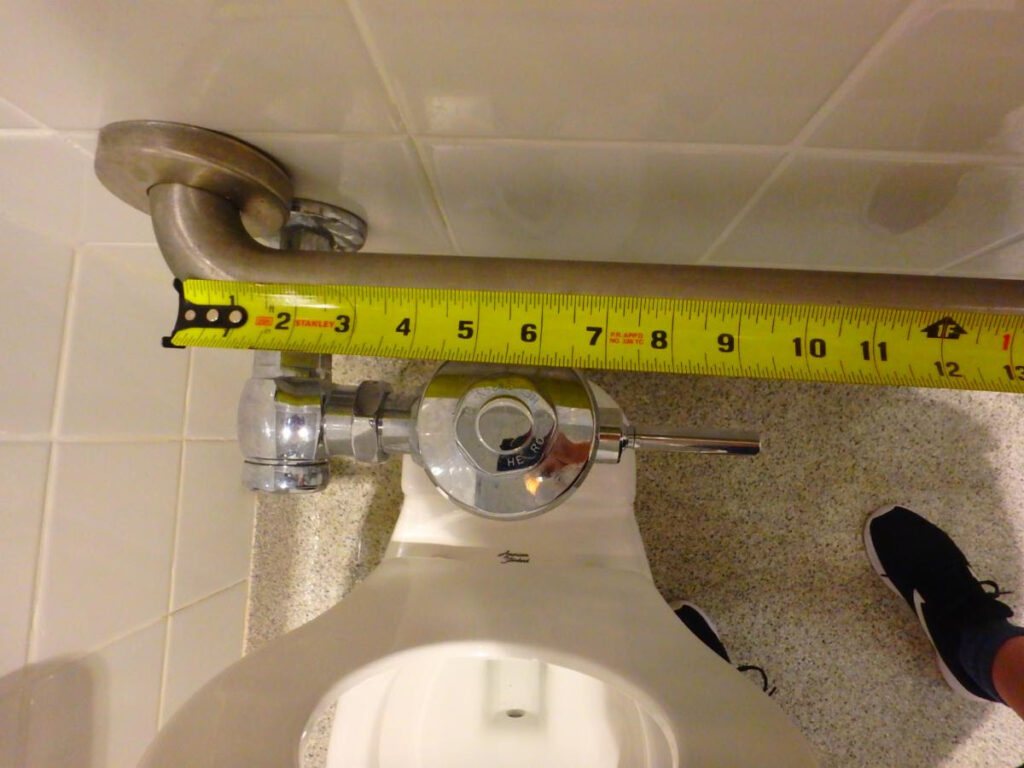
The photo above shows the grab bar at the rear wall located only 5 1/2″ from the centerline of the water closet to the inner edge close to the side wall.
Because the toilet was located 12″ from the side wall, the grab bar was not able to also be located 12″ from the centerline to the inner edge closest to the side wall. There was not enough room for both requirements to be met. It would have been acceptable to locate the toilet a bit farther away from the side wall in order to allow the grab bar location to also be met.
Another section that sometimes creates conflicts is the height of the water closet.
604.9.3 Height. The height of water closets shall be 11 inches (280 mm) minimum and 17 inches (430 mm) maximum measured to the top of the seat….
Most toilets for children are only 11″ high as shown in the cut sheet below.
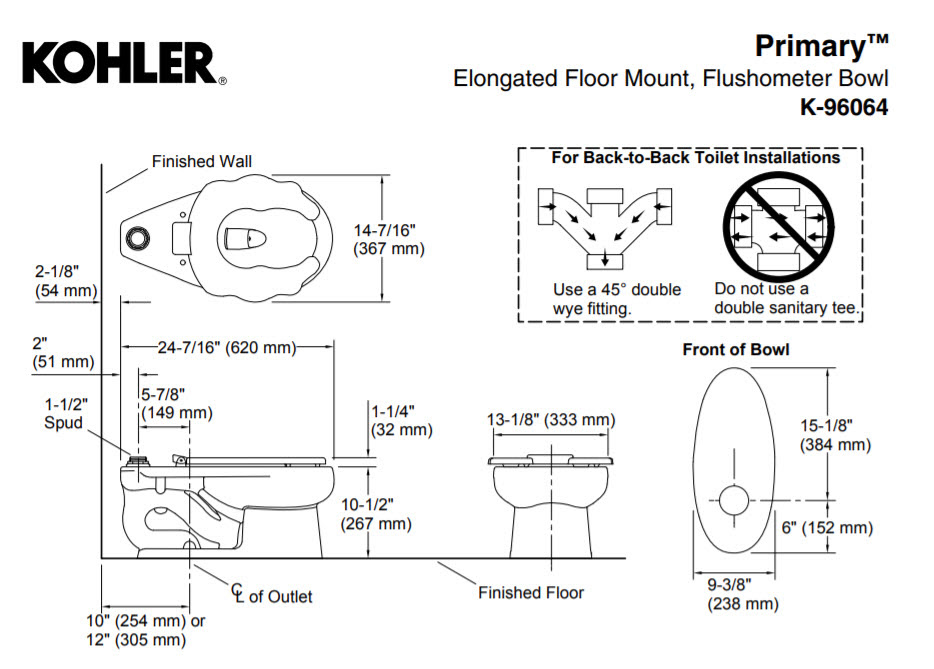
The range is really from 11″-17″ to the top of the seat, and the chart (again for children 3-4 years old) will allow a range from 11″-12″ of height. Even though this is allowed, in a real world scenario this is very low for children and creates issues with the height of the rear wall grab bar as well.
If the intent is to have these toilets for a certain age group, providing a short toilet does not give flexibility if the ages in the classroom changes to older grades.
The position of grab bars is another requirement that is often misunderstood as it relates to the Advisory chart. The requirements are:
609.4 Position of Grab Bars. Grab bars shall be installed in a horizontal position, 33 inches (840 mm) minimum and 36 inches (915 mm) maximum above the finish floor measured to the top of the gripping surface, except that at water closets for children’s use complying with 604.9, grab bars shall be installed in a horizontal position 18 inches (455 mm) minimum and 27 inches (685 mm) maximum above the finish floor measured to the top of the gripping surface.
The chart states that for children 3 years of and 4 years old the height of the gripping surface must be between 18″-20″. Sometimes there is a conflict with the height of the flush connector pipes (vacuum breaker) used for children’s toilet. This will cause the grab bar not to fit correctly. Since these are just “advisory” ranges, you are allowed to make the grab bar location higher to avoid the pipes if necessary.
There is a note in the Standards that allows the rear wall grab bar to be shifted over or split if there is a conflict, but that is only allowed when the Administrative Authority Having Jurisdiction requires the location of the grab bar or the pipe to conflict with the ADA requirements.
ADA/TAS 604.5.2 Rear Wall Grab Bar
Exception 2. Where an administrative authority requires flush controls for flush valves to be located in a position that conflicts with the location of the rear grab bar, then the rear grab bar shall be permitted to be split or shifted to the open side of the toilet area.
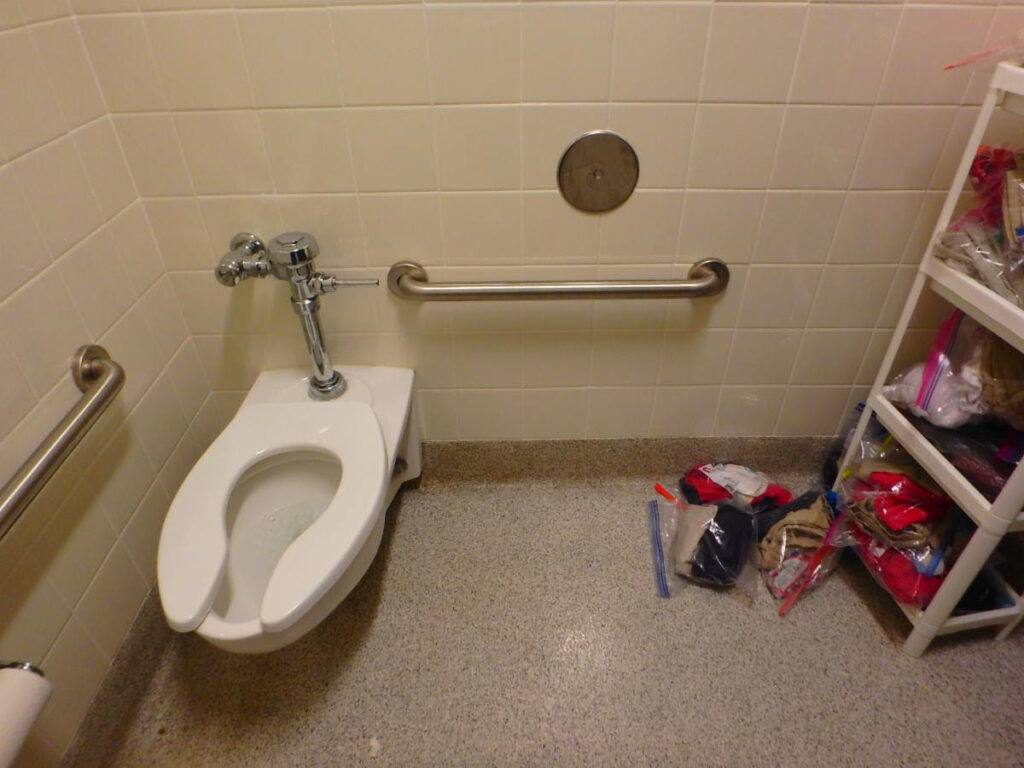
The rear wall grab bars was shifted because it did not fit where the flush control pipe was located
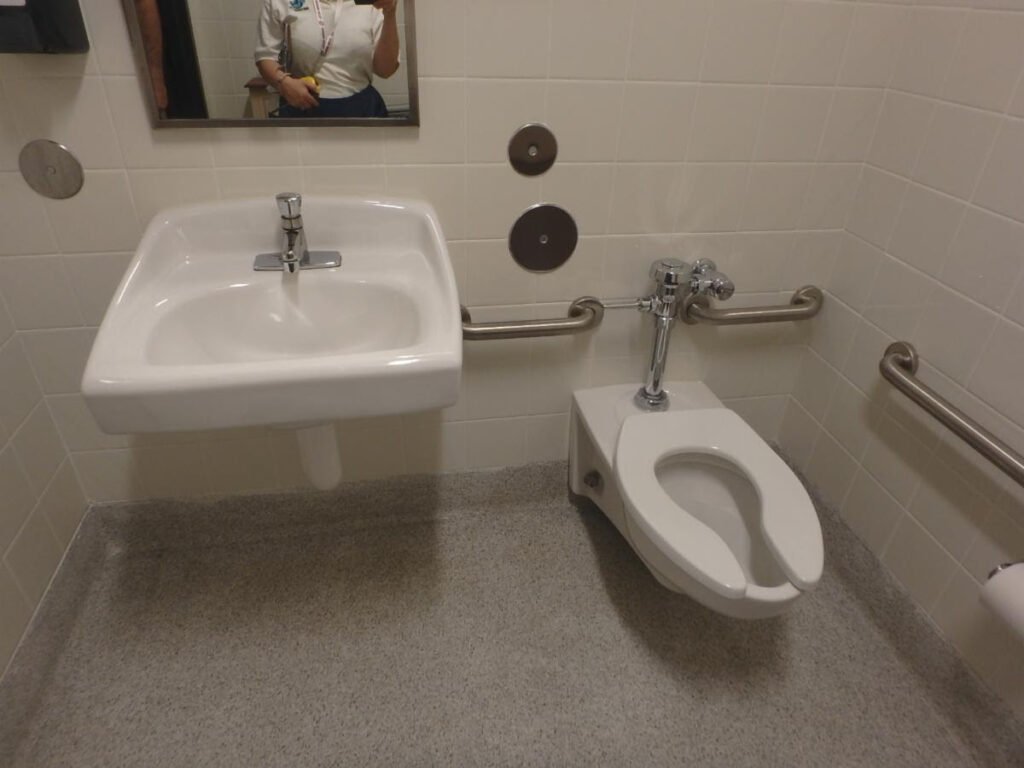
The rear wall grab bars were split because the height selected was in conflict with the pipes (this is an older toilet and the 60″ clearance was not provided)
TDLR Owner vs. Owner Agent
TDLR has a requirement that the Owner of a facility is the only one that can request the inspection, confirm if corrections have been made after an inspection, inform the RAS if the project has been delayed or cancelled. An owner can also designate someone else to be the liaison and has signing authority while the project is under TDLR.
The confusion becomes on who is the owner and who is the agent. TDLR came up with a document to explain it.
Click Here to see the document

Remember to practice your Civic duty and go vote on November 3rd. If you would like to learn about accessibility requirements for polling places, read my past newsletter on the topic
Click Here for past newsletter on accessible polling places
Click here for Accessible Polling places DOJ’s Check list

Monday, August 3rd, 2020
The following is an excerpt from ArchitecturalRecord.com. Marcela Abadi Rhoads, owner of Abadi Accessibility is quoted in the article:
This month marks 30 years since President George H.W. Bush signed into law the Americans with Disabilities Act (ADA) on July 26, 1990. One of the most sweeping pieces of civil rights legislation in the country’s history, its guidelines and protections have changed the way we work, learn, and move through space. For architects and planners, it has meant a complete shift in thinking about accessibility and inclusive design. Now, on this landmark anniversary, experts weigh in on how far we have come and what a more equitable future might look like with the help of ADA.
Read the article in its entirety here.
Monday, February 3rd, 2020
There are a few of requirements in the 2010 ADA Standards that speak about ways that people get around. Some are described as either “circulation path”, “path of travel”, “accessible route” or “vehicular path”. Those all speak about either a car, wheelchair or pedestrian means of getting different places. In my experience, there is a misunderstanding about the difference between “circulation path” and “path of travel” and “accessible route”.
Path of Travel and Accessible route are mainly describing the “unobstructed” path that a wheelchair user would take.

But a circulation path is speaking about a path where any pedestrian would use to get around. As it pertains to Americans with disabilities, this term is used for persons who are visually impaired, but are still able to walk.

The idea is that a person who cannot see very well cannot detect certain hazards along the path that he will take to find his way around (i.e. the circulation path). This newsletter will discuss this concept and will give examples of some “circulation paths”
Protruding Objects
When a person who is visually impaired is walking to find their way, that is a description of his or her “circulation path”. Since they cannot see, we are required to make sure there are no hazards along their path. Those hazards are any objects located along the circulation path that are mounted higher than 27″ a.f.f. or lower than 80″ a.f.f. and projects more than 4″ onto the path.

….because the bar is a protruding object
A protruding object, cannot be detected by a cane which is one of the ways that a person who is visually impaired finds their way. Here is a video by the US Access Board that explains this topic.
Circulation Path
What becomes confusing for people is the other terms in the standard. What is a circulation path? What is an accessible route? What is a path of travel? A circulation path is different than an accessible route. An accessible route is solely for people in wheelchairs. It must be a certain width and should be located so that people in wheelchairs can use it without much effort.
A circulation path, on the other hand, can be used by anyone. It describes the path that a person who can walk will be taking. And that can really be anywhere that leads you from one place to another. Below are some examples:
The obvious circulation path is a corridor. That is what most people think of when they see the words “circulation path”. Along a corridor, make sure the sconces are not mounted lower than 80″ a.f.f. if they are deeper than 4″.

A corridor is a circulation path.
A circulation path can be anywhere where people are walking. So from one side of the bar shown below to the other side is a circulation path and the counter should not project more than 4″ onto it.

The bar top projects more than 4″ onto the circulation path between one side of the bar to the other.
The path to the restroom door is a circulation path. The paper towel dispenser is mounted along that path and it is deeper than 4″, therefore it is a protruding object.

The paper towel dispenser in the restroom is located along the circulation path.
The circulation path to the desk has a display cabinet that projects more than 4″ onto it.
 The display case is located in the circulation path to the desk.
The path to the restroom door is considered the circulation path. The drinking fountain is located on the circulation path of that door and it is a protruding object.

The drinking fountain projects more than 4″ onto the circulation path to the restroom door.
The drinking fountain in the photo below is also located along the circulation path too the restroom door. It is partially recessed, but since the bottle filler is not the same depth as the drinking fountain it does not provide cane detection.

The drinking fountain is located along the circulation path to get to the door beyond.
The circulation path to the lavatory has a hand dryer projecting onto it.

The path to the lavatory is the circulation path.
Any place in a plaza where people walk is part of a circulation path. The sculpture is located within the circulation path and the angled parts come down to less than 80″ a.f.f. and are considered protruding objects.

The planters were added at each angle as cane detection.
When discussing circulation paths, keep in mind that although an accessible route is a circulation path because that is where wheelchairs will go, a circulation path is not an accessible route. A circulation path is where ANYONE can go. There may be many more examples of circulation paths, so let’s keep them free from hazards and protruding objects.
Friday, January 3rd, 2020
As most of us know, the minimum clear widths along an accessible route that the ADA requires are 36″ minimum clear. But there are times when are allowed to be narrower or required to be wider. This newsletter will explain those instances.
|
Clear Width Reduction
In the 2010 ADA guidelines, section 403 gives us a figure to follow which explains that the 36″ wide clear width can be reduced to 32″ clear as long as the distance that you travel through the narrower width is no more than 24″ deep.
403.5.1 Clear Width. Except as provided in 403.5.2 and 403.5.3, the clear width of walking surfaces shall be 36 inches (915 mm) minimum.
EXCEPTION: The clear width shall be permitted to be reduced to 32 inches (815 mm) minimum for a length of 24 inches (610 mm) maximum provided that reduced width segments are separated by segments that are 48 inches (1220 mm) long minimum and 36 inches (915 mm) wide minimum.
But do both sides of the path need to be 24″ long the way it is shown in the figure above? Could one side be a wall or even a longer cabinet or obstruction? I was inspecting a restroom and found that condition. There was a cased opening to enter the toilet compartment area. One side of the cased opening was 8″ deep and the other side was the restroom wall which was longer than 24″.
|
|
| This is the photo of the cased opening along the route to the sinks |
|
|
| This is the plan of the cased opening (where it says “Align”) which part of it is 8″ on one side and longer than 24″ on the other side. The opening was less than 36″ wide. |
The guidelines allow this. As long as one side of the path is no more than 24″ long and it goes back to 36″ wide, it will be an acceptable condition.
|
Clear width at the approach to a toilet compartment
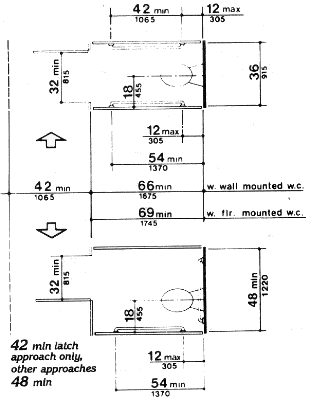
A clear path to a toilet compartment (both wheelchair and ambulatory) should also have a 36″ minimum clear width. Except that at the approach to the door it must increase to 42″ in width
604.8.1.2 Doors. Toilet compartment doors, including door hardware, shall comply with 404 except that if the approach is to the latch side of the compartment door, clearance between the door side of the compartment and any obstruction shall be 42 inches (1065 mm) minimum
The standard is giving us requirements for the door clearance only. The path to the toilet compartment is still required to have a 36″ minimum clear width. But the space to open the toilet compartment door and the maneuvering clearance (if the approach is on the latch side) must have a 42″ minimum clear width between the door and the obstruction
|
|
This photo shows the plan view of a path to the ambulatory toilet compartment.
|
In the plan view above you can see a furred out column in front of the toilet compartments. That fur out is located within the door maneuvering clearance of the ambulatory toilet compartment and it reduces the 42″ required width to 36″
This figure above shows the door maneuvering clearance at the latch side approach. A toilet compartment door will only require 42″ of clear width not 48″ like a standard door.
|
Passing space
Along an accessible route you are required to have 36″ clear width. This width is required to be widened to 60″ every 200 feet. This is to allow people in wheelchairs and pedestrians to pass each other.
403.5.3 Passing Spaces. An accessible route with a clear width less than 60 inches (1525 mm) shall provide passing spaces at intervals of 200 feet (61 m) maximum. Passing spaces shall be either: a space 60 inches (1525 mm) minimum by 60 inches (1525 mm) minimum; or, an intersection of two walking surfaces providing a T-shaped space complying with 304.3.2 where the base and arms of the T-shaped space extend 48 inches (1220 mm) minimum beyond the intersection
Here is a video from the Access Board that explains it
|
Clear width at turns
When a wheelchair makes a ninety degree turn, a 36″ minimum clear width is allowed.
But when a wheelchair is required to make a 180 degree turn, like in a narrow corridor, or maybe in a queue line or library stacks, then the width will have to increase from 36″ to 42″ depending on what size the element they are turning around is.
403.5.2 Clear Width at Turn. Where the accessible route makes a 180 degree turn around an element which is less than 48 inches (1220 mm) wide, clear width shall be 42 inches (1065 mm) minimum approaching the turn, 48 inches (1220 mm) minimum at the turn and 42 inches (1065 mm) minimum leaving the turn.
EXCEPTION: Where the clear width at the turn is 60 inches (1525 mm) minimum compliance with 403.5.2 shall not be required.
For instance if the space that they are turning around is 60″ in depth, then the clear width can be 36″ min. If the space is 48″, then the clear width will have to increase to 42″
This video will give you some guidance on turning and wheelchair clearances
|

Monday, December 2nd, 2019
After almost 20 years in my business I am still learning things about the ADA and TAS. I want to share with you some things that might not be so apparent when you read the standards.
|
Location of Work Surface in a Residential Kitchen
When designing a residential kitchen that will be used by the public (e.g. a an assisted living resident room, a kitchen in an emergency personnel facility, an apartment for a resident hall director or RA etc.) the appliances that you choose will have to be compliant with the ADA and TAS. One of the requirements is typically missed or overlooked. It is the one pertaining to a work surface in a “residential kitchen”.
804.3 Kitchen Work Surface. In residential dwelling units required to comply with 809, at least one 30 inches (760 mm) wide minimum section of counter shall provide a kitchen work surface that complies with 804.3
804.6.5.1 Side-Hinged Door Ovens. Side-hinged door ovens shall have the work surface required by 804.3 positioned adjacent to the latch side of the oven door.
804.6.5.2 Bottom-Hinged Door Ovens. Bottom-hinged door ovens shall have the work surface required by 804.3 positioned adjacent to one side of the door.
|
|
| Where a work surface is required and the kitchen has an oven, the work surface needs to be located adjacent the oven. |
Keep in mind, this only applies to “residential” kitchens….not all kitchens. So a break room or common use kitchen not located in a residential dwelling unit (as defined by the ADA) does not require a work surface.
|
Clearance vs. Clear Floor Space
There are two concepts that are sometimes thought to be interchangeable in the ADA and TAS: “Clearance” and “Clear Floor Space”. Section 305 lists the requirements for “Clear floor space” . Clear floor space is required adjacent beds, under counters, lavatories, sinks, at operable parts for reaching, inside platform lifts, at drinking fountains, at toilet room fixtures, at washer and dryers, at saunas and steam rooms, at ATM, at signage, at work surfaces, at jury boxes and adjacent exercise equipment.
Some of the requirements are listed below from Section 305:
305.2 Floor or Ground Surfaces. Floor or ground surfaces of a clear floor or ground space shall comply with 302. Changes in level are not permitted.
EXCEPTION: Slopes not steeper than 1:48 shall be permitted.
305.3 Size. The clear floor or ground space shall be 30 inches (760 mm) minimum by 48 inches (1220 mm) minimum.
Any time that the words “clear floor space” is found in the Standards these are the requirements that must be followed. Some of those instances will be at the clear floor space to reach objects, a clear floor space at wheelchair seating in assembly areas or clear floor space at toilet rooms.
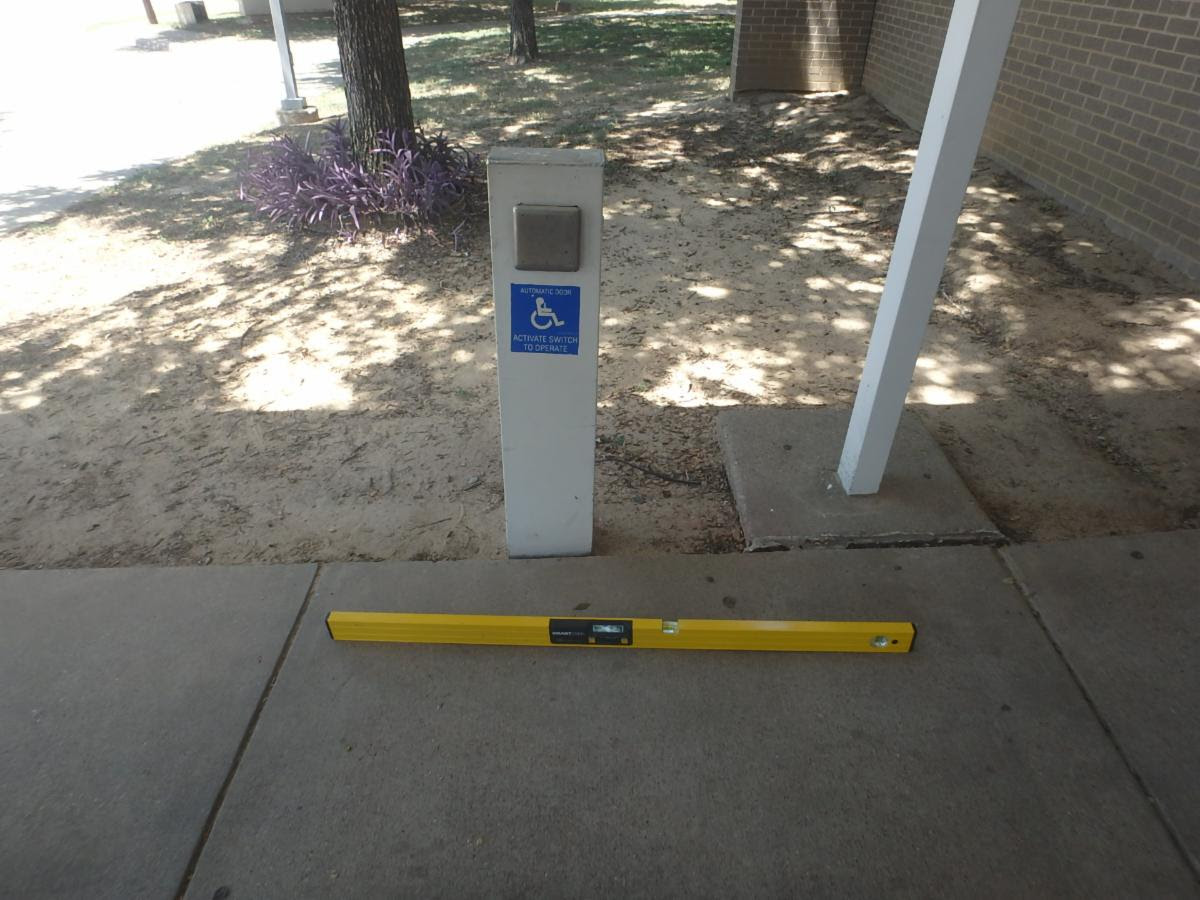 A clear floor space is required at the push button. The clear floor space needs to have a slope no steeper than 1:48 . This clear floor space is steeper.
|
|
Clearance
What sometimes gets conflated are the “clearance” at plumbing fixtures like toilets, showers and tubs. “Clear floor space” is defined, but “clearance” is not….except to describe its size and location.
608.2.2.1 Clearance [at roll in showers]. A 30 inch (760 mm) wide minimum by 60 inch (1525 mm) long minimum clearance shall be provided adjacent to the open face of the shower compartment.
The clearance is mentioned to let us know what size we need to provide and where it should be located…but it does not mention slope.
Unlike the clear floor space where a slope cannot exceed 1:48, a clearance at the shower for example is not defined. So the clearance at the roll in shower can have a slope that exceeds 1:48
|
|
| This roll in shower has a slope up to the shower pan which is acceptable (although may not be recommended) |
|
Friday, November 1st, 2019
Showers are not all the same. There are three types that are described in the ADA standards for showers: transfer showers, roll in showers and alternate roll in showers (which is like a hybrid between the transfer and the roll in shower). Their requirements also vary depending on where they are located.
Below are the requirements in showers, and specifically in a transient lodging facility.
Minimum number of roll in showers required
In the ADA Standards under 224 Transient Lodging there is a chart that we use to calculate how many rooms must be accessible.

There are requirements for rooms with mobility features (for persons with mobility disabilities) and there are requirements for how many rooms with communication features (rooms for persons that are either hearing impaired or visually impaired). When designing rooms with mobility features one of the requirements is to provide a minimum number of rooms with roll in showers and without roll in showers.
If you notice the chart above, note that if you have less than fifty rooms in a transient lodging facility, then you MUST provide rooms WITHOUT a roll in shower. So that would mean either a tub or a transfer shower must be provided in a certain number of rooms. All your bathing facilities cannot be roll- in-showers.
The photos below show you two bathing facilities that are not roll-in-showers:
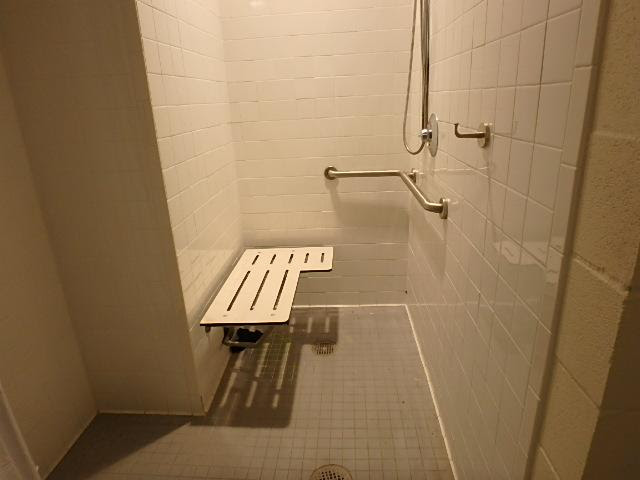
Transfer Shower
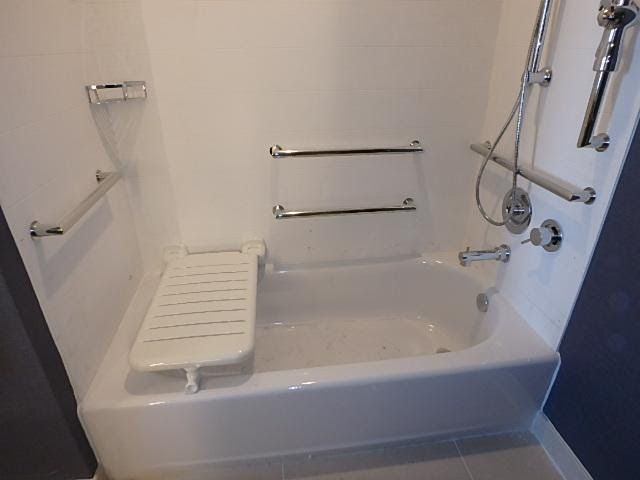
Tub with a fixed and folding seat
If you would like to also provide roll in showers for persons with disabilities you could, but you must first provide the rooms without the roll in showers as stated in the chart. Any additional rooms provided with mobility features beyond the amount on the chart can have a roll in shower.
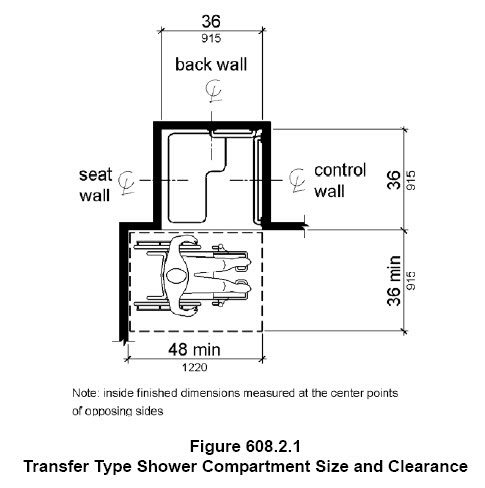
Transfer shower
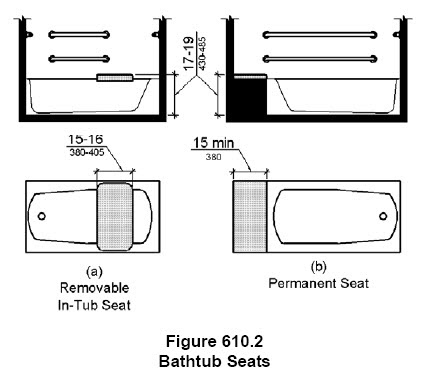
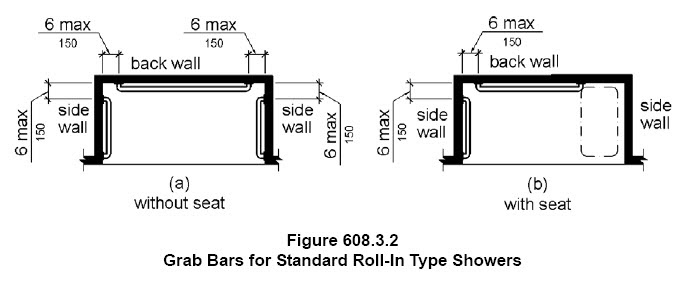
Fixed Shower Seats
There are also requirements for seats in showers. In a typical installation that is not located in a transient lodging, the only shower that requires seats are the transfer showers. If you provide a roll in shower or an alternate roll in shower, having a seat is optional. If you do provide them then you must locate the shower controls close to the shower seat.
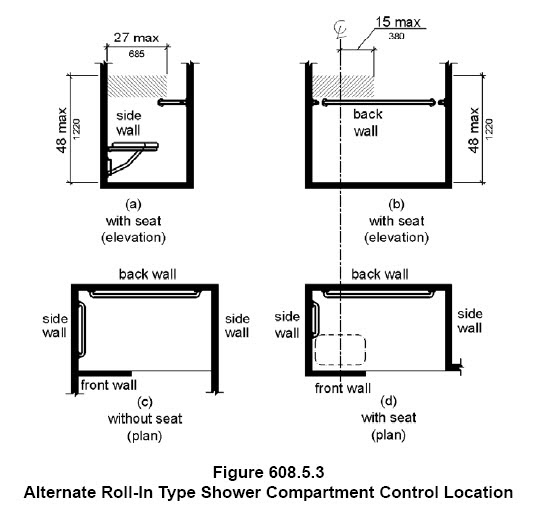
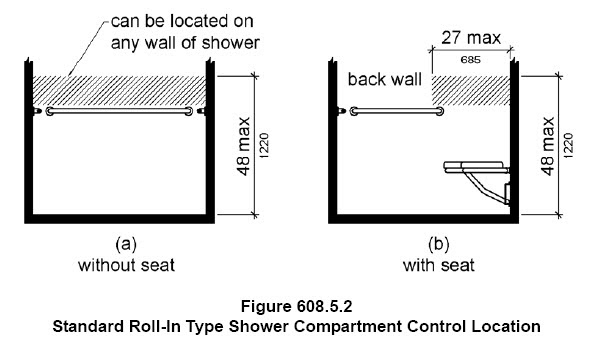
But in a transient lodging you MUST install a shower seat no matter what type of shower you are providing.

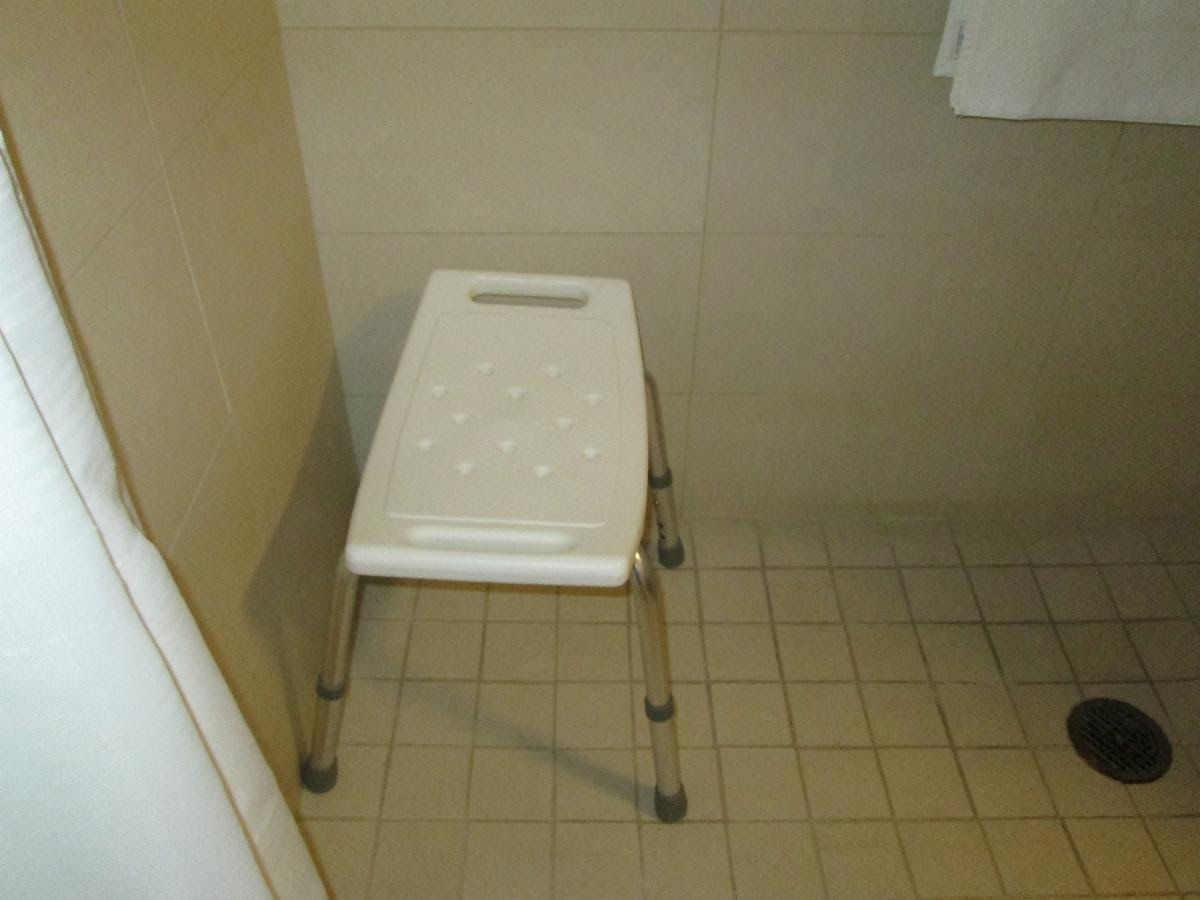
Part of the requirement is that the seat be fixed and either folding or non-folding, EXCEPT in a transient lodging room with a roll in shower.
608.4 Seats. A folding or non-folding seat shall be provided in transfer type shower compartments. A folding seat shall be provided in roll-in type showers required in transient lodging guest rooms with mobility features complying with 806.2. Seats shall comply with 610.
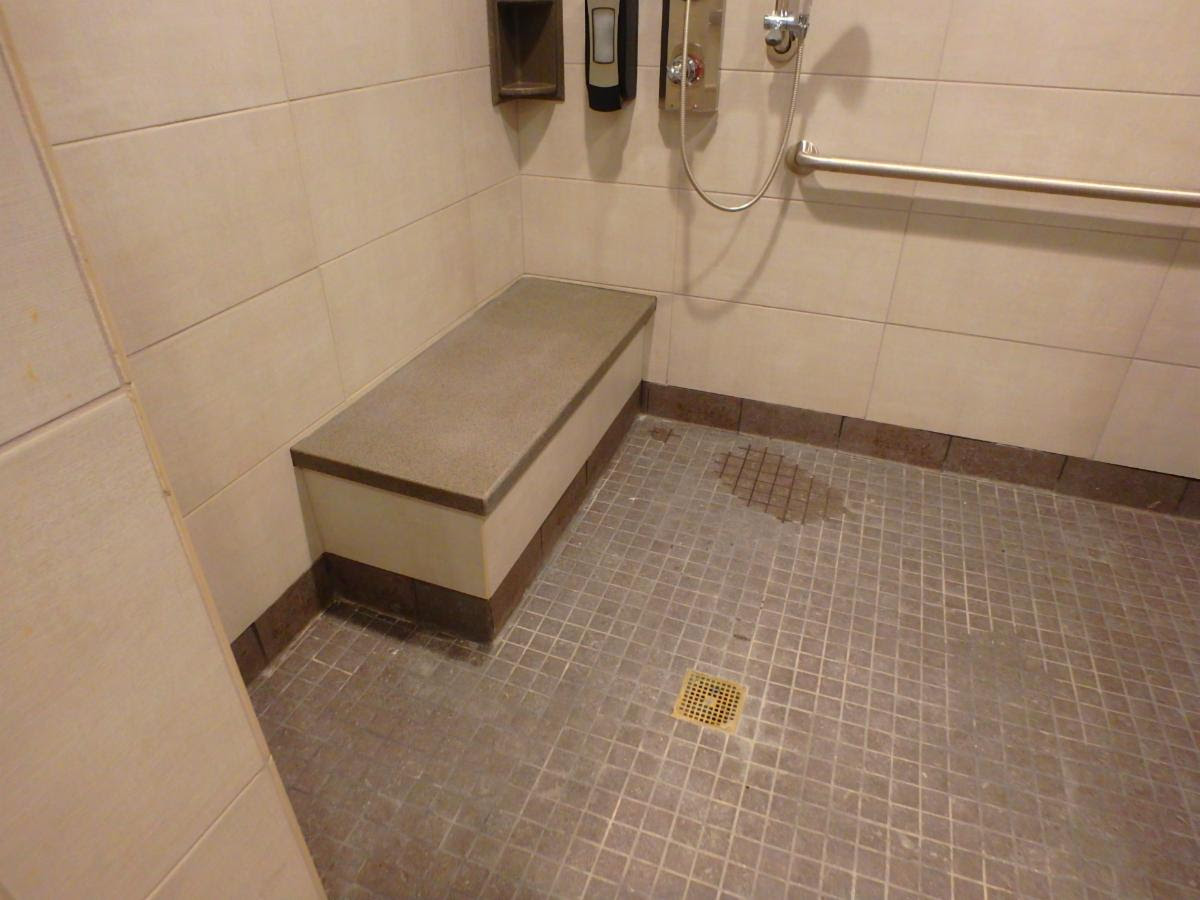
So what that means is that if you have a roll in shower that is not located in a transient lodging facility you can provide a seat that is fixed but not folding.
Wednesday, October 2nd, 2019
Safe Harbors in Restrooms
|
Safe Harbor is a provision that was adopted by the Department of Justice as well as the Texas Department of Licensing and Regulation where it allows an existing element that meets the original Standard to remain as it is even if it does not meet the new standards. It can only remain a safe harbor as long as it is not touched. Once it is remodeled, removed or relocated then it must comply with the new standards. Our newsletter gives a couple of examples of safe harbor provisions in restrooms.
|
Toe clearance at toilet compartments
The 2010 ADA Standards for Accessible design (and the 2012 TAS) requires that a 9″ high toe clearance be provided on two sides of the toilet compartments so that a person in a wheelchair can maneuver inside the stall and be able to exit. But the 1991 ADAAG (and the 1994 TAS) only required a toe clearance if the “stall” was less than 60″ deep.
4.17.4 Toe Clearances. In standard stalls, the front partition and at least one side partition shall provide a toe clearance of at least 9 in (230 mm) above the floor. If the depth of the stall is greater than 60 in (1525 mm), then the toe clearance is not required.
If you have a hard wall toilet compartment built prior to 2012 that is more than 60″ deep and 60″ wide, but no toe clearance, it is allowed to remain narrow. It does not require the additional 6″ of width as the 2010 ADA does.
|
|
| This toilet compartment is 60″ wide but because it is longer than 60″ it does not require toe clearance |
|
“Alternate” Toilet Compartments
There was a term in the original ADA standards that is no longer used: “Alternate stall”. This was what we now call an ambulatory compartment but it was allowed to be used instead of a standard wheelchair accessible compartment if there was not room and only in alterations.
4.17.3 EXCEPTION: In instances of alteration work where provision of a standard stall (Fig. 30(a)) is technically infeasible or where plumbing code requirements prevent combining existing stalls to provide space, either alternate stall (Fig. 30(b)) may be provided in lieu of the standard stall.
|
|
These are the “alternate” stalls allowed in alterations |
The word “technically infeasible” is meant to imply that a variance would be required where a AHJ like The Texas Department of Licensing and Regulation is involved. So in order to determine if the compartment is a “Safe Harbor” the variance that allowed it to be used would need to exist.
|
“Ambulatory” Toilet Compartments
In the 1991 ADAAG the “ambulatory” stall is described as a stall required when six or more stalls are provided.
4.22.4 Water Closets. If toilet stalls are provided, then at least one shall be a standard toilet stall complying with 4.17; where 6 or more stalls are provided, in addition to the stall complying with 4.17.3, at least one stall 36 in (915 mm) wide with an outward swinging, self closing door and parallel grab bars complying with Fig. 30(d) and 4.26 shall be provided. Water closets in such stalls shall comply with 4.16. If water closets are not in stalls, then at
least one shall comply with 4.16.
So only restrooms with toilet compartments are required to also provide “ambulatory stalls”. So if a mens’ restroom has three urinals and three toilet compartments, that would not add up to six “stalls” therefore an ambulatory stall would not be required.
But in the 2010 ADA changed the wording to say:
213.3.1 Toilet Compartments. Where toilet compartments are provided, at least one toilet compartment shall comply with 604.8.1. In addition to the compartment required to comply with 604.8.1, at least one compartment shall comply with 604.8.2 where six or more toilet compartments are provided, or where the combination of urinals and water closets totals six or more fixtures.
So now, when a restroom has three urinals and three compartments, then one of the compartments would have to be an ambulatory compartment.
So an existing pre-2010 ADA restroom with three urinals and three compartments and no ambulatory stall, is a safe harbor and can remain this way until it is remodeled.
|


 Abadi
Abadi 


 The display case is located in the circulation path to the desk.


