Uncategorized
Wednesday, July 1st, 2015
There is a misconception that a private bathroom is exempted from having to comply with the 2010 ADA Guidelines and the 2012 TAS. In reality, even private bathrooms must comply, although there are some exceptions they can take. In order to take the exceptions, a bathroom is deemed “private” if the bathroom is accessed from a private office and not for public or common use. This newsletter will discuss what items are required to be provided at private bathrooms, and which one’s can be left out. There is a summary from TDLR on TM 2013-19 which we will discuss in detail.
Toilets
At a private bathroom that is accessed through a private office and not for common use, the toilets must comply with all the requirements except for:
- The height of the toilet does not have to be 17″-19″ a.f.f. It can be higher or lower than the minimum required heights.
- Grab bars are not required to be installed, but blocking must be provided within the wall for future installation
- In the Toilet and Bathing rooms the door shall swing into the clear floor space of the fixtures in a private office
So a private toilet must still have the clearances required at the floor area distance from the side wall, flush control and toilet paper dispenser must comply with 604
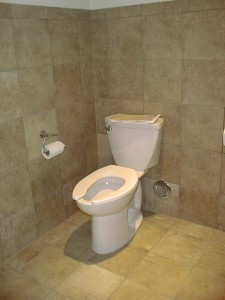
The photo above shows the proper floor clearance, but the flush control and the toilet paper dispenser were not correctly located
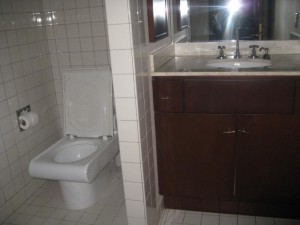
The toilet in this photo does not have the proper floor clearance per 604 nor is the toilet paper dispenser mounted at the proper location
Sinks
At a private bathroom accessed from a private office and not for public use must have a sink that complies with everything in section 606 except:
- The sink does not have to have a knee space complying with 306 for forward approach. A parallel approach is allowed to be provided.
- The height of the sink does not have to be a 34″ a.f.f. maximum. It can be higher or lower than what the Standards require.
The sink is required to have the proper faucet mechanism, the mirror at the correct height, and floor area for parallel approach.

Because a private bathroom does not require a knee space at the sink, a pedestal sink can be used. The mirror on the other hand must be mounted at 40″ a.f.f. to the bottom of the reflective surface.
Showers and Tubs
At a private bathroom accessed by a private office and not for public or common use, the showers and tubs have to comply with all the requirements of section 607 and 608 except for:
- Grab bars do not have to be installed, but blocking within the walls for future installation must be provided.
Otherwise, a shower must have the controls installed at the proper reach range, a hand held shower unit must be provided, the threshold at the entry must not be higher than 1/2″, the size of the shower must comply, and at a transfer shower a seat must also be provided.

This shower doesn’t have a seat or a handheld shower unit. In addition there is a door which doesn’t have clearance on the interior of the shower
Upcoming Continuing Education Opportunities
HAPPY 4TH OF JULY!!!!
Tuesday July 21st from 3:00-4:00 CST “Understanding the 2010 ADA Standards” Provided by Green CE
Thursday July 23rd
Sit in a wheelchair for a Day! Join several of your fellow architects in Dallas and experience what a person who uses a wheelchair experiences. For more information contact Marcela Rhoads at marhoads@abadiaccess.com
Friday July 24th ALL DAY! Join Us!!!
Marking the 25th anniversary of the ADA, July 24th will be ADA Awareness day in Dallas Texas. The AIA Dallas’s Codes and Standards committee is planning a day full of great programs. Stay tuned. If you want to be a sponsor, let me know.

Thank you to our Sponsors: Andres Construction, Access by Design and
Abadi Accessibility
If you are interested in Building Code seminars check out my colleague Shahla Layendecker with SSTL Codes
If you want to learn more about these standards, be sure to check out my books:
“The ADA Companion Guide” “Applying the ADA” published by Wiley.

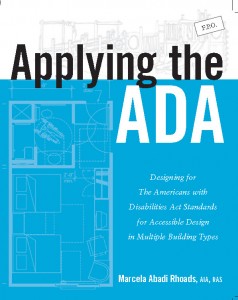
They are available for sale now. (also available as an e-book)
If you have any questions about these or any other topics, please feel free to contact me anytime.
Marcela Abadi Rhoads, RAS #240
Abadi Accessibility
214. 403.8714
marhoads@abadiaccess.com
www.abadiaccess.com
Useful Links
Monday, June 1st, 2015
The 2010 ADA Standards are full of little nuances that, unless you are used to them, are easy to miss. There are two that have come up several times in my inspections lately and I wanted to share them with you so maybe you won’t be caught unaware.
Vision Lights at Doors
The 2010 ADA Standards states:
404.2.11 Vision Lights. Doors, gates, and side lights adjacent to doors or gates, containing one or more glazing panels that permit viewing through the panels shall have the bottom of at least one glazed panel located 43 inches (1090 mm) maximum above the finish floor.EXCEPTION: Vision lights with the lowest part more than 66 inches (1675 mm) from the finish floor or ground shall not be required to comply with 404.2.11.404.3
The key item that is missed is that not all vision lights must meet the requirement. If the glazing does not allow viewing, then it does not have to comply with this section.
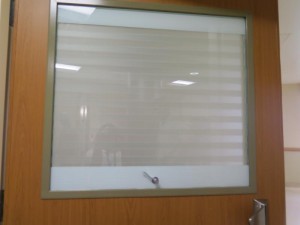
This vision light does not have glazing you can view through and therefore can be located higher than 43″ a.f.f.
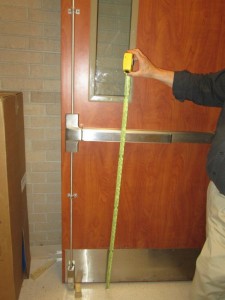
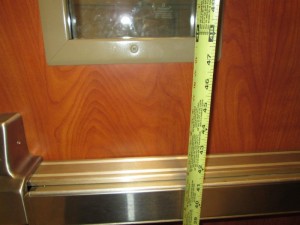
This vision light was mounted higher than 43″ a.f.f. and since you can see through the light it must comply. This applies to all doors that require passage (including work area doors)
Hand held shower unit
An accessible shower and tub are required to have a hand held shower unit. There are certain rules that pertain to this equipment that could be missed. Both showers and tub hand held unit should have an on-ff button with a non-positive shut off.. Most hand held devices do not have it, and they are not considered compliant.
607.6 Shower Spray Unit and Water [at tub]. A shower spray unit with a hose 59 inches (1500 mm) long minimum that can be used both as a fixed-position shower head and as a hand-held shower shall be provided. The shower spray unit shall have an on/off control with a non-positive shut-off. If an adjustable-height shower head on a vertical bar is used, the bar shall be installed so as not to obstruct the use of grab bars. Bathtub shower spray units shall deliver water that is 120°F (49°C) maximum.
608.6 Shower Spray Unit and Water [at showers]. A shower spray unit with a hose 59 inches (1500 mm) long minimum that can be used both as a fixed-position shower head and as a hand-held shower shall be provided. The shower spray unit shall have an on/off control with a non-positive shut-off. If an adjustable-height shower head on a vertical bar is used, the bar shall be installed so as not to obstruct the use of grab bars. Shower spray units shall deliver water that is 120°F (49°C) maximum.
EXCEPTION: A fixed shower head located at 48 inches (1220 mm) maximum above the shower finish floor shall be permitted instead of a hand-held spray unit in facilities that are not medical care facilities, long-term care facilities, transient lodging guest rooms, or residential dwelling units.
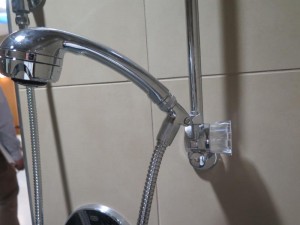
This unit does not have an on/off button and the controls to adjust the handle are the type that requires tight grasping and twisting of the wrist to operate.
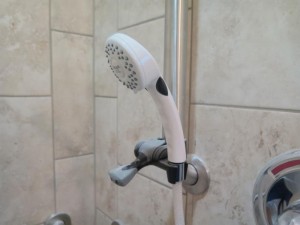
This unit has an on/off button and the control to adjust the height does not require tight grasping and twisting of the wrist to operate
Upcoming Continuing Education Opportunities
Save the Date:
Marking the 25th anniversary of the ADA, July 24th will be ADA Awareness day in Dallas Texas. The AIA Dallas’s Codes and Standards committee is planning a day full of great programs. Stay tuned. If you want to be a sponsor, let me know.
If you are interested in getting a Barrier Free/ADA CEU online, I partnered with Green CE. We will be presenting live webinars this year. We will post details as they become available
If you are interested in Building Code seminars check out my colleague Shahla Layendecker with SSTL Codes
If you want to learn more about these standards, be sure to check out my books:
“The ADA Companion Guide” “Applying the ADA” published by Wiley.


They are available for sale now. (also available as an e-book)
If you have any questions about these or any other topics, please feel free to contact me anytime.
Marcela Abadi Rhoads, RAS #240
Abadi Accessibility
214. 403.8714
marhoads@abadiaccess.com
www.abadiaccess.com
Useful Links
Friday, May 1st, 2015
Baby changing stations have become a part of every restroom design. But often times, they are not thought about when designing for accessibility. What happens if a person in a wheelchair needs to change their baby’s diaper? What if the location of the baby changing station will be in the way of the restroom door or the toilet stall door? What if the only diaper changing station is in the accessible stall?
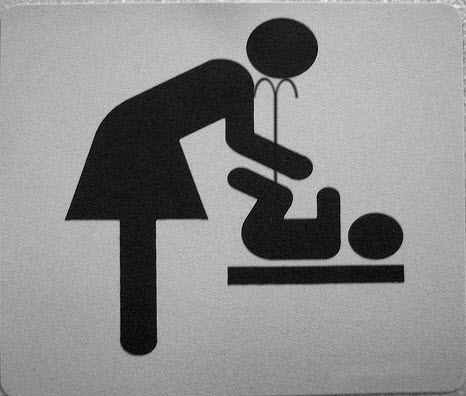
This newsletter will shed some lights on the nuances of the requirements
Scoping and Technical criteria for Diaper Changing Stations
According the the ADA, ANSI and TAS a baby changing station is considered a “non-employee work surface” and therefore must follow the scoping requirements of ADA/TAS section 226 which requires that 5% (but no less than one) should be accessible and meet section 902 requirements.
Section 1109.2 of the IBC also states:
“at least one of each type of fixture, element, control or dispenser in each accessible toilet room and bathing room shall be accessible”.
And even though it does not mention diaper changing stations, the 2009 ANSI has section 603.5 that specifically discusses Diaper changing tables, and it requires that it should follow section 309 and 902.
Section 309 of both ADA and ANSI requires that the height of the operating mechanism (handle to open and close) be located no higher than 48″ a.f.f.
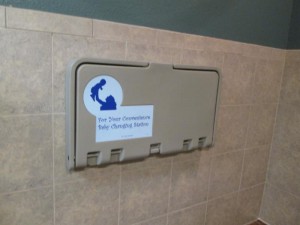
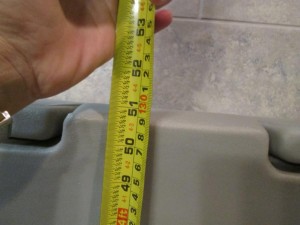
The diaper changing station shown above was mounted so that the opening mechanism was mounted at 51″ a.f.f.
Section 902 requires that once open, the table/counter be no higher than 34″ a.f.f.
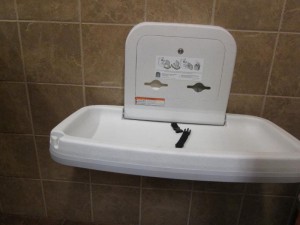
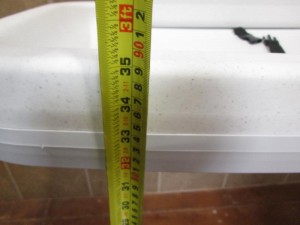
This diaper changing station was mounted so that the top of the table higher than 34″ a.f.f.
Section 902 also requires that,once open, the table/counter have a forward approach knee clearance that is 27″ a.f.f. min.
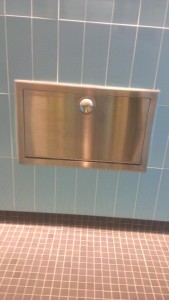
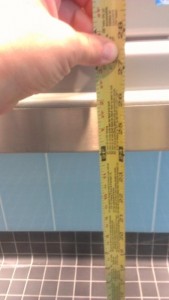
This diaper changing station was mounted incorrectly and only provided 24″ a.f.f. of knee clearance
Proper and improper locations
Now that we know how to make diaper changing stations/tables accessible, we need to explore the location within the restroom which will allow the technical requirements to be met without creating any other accessibility issues.
One of the requirements is for the diaper changing station to have a forward approach knee space. The location of the table or counter must not have anything in front of it which will impede the forward approach.
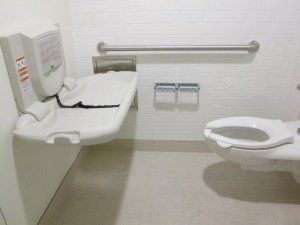
This baby changing station does not have a clear forward approach because the toilet is in the way
Can the diaper changing station be inside a toilet compartment? Yes as long as there is enough room for a forward approach. Even though it is not a violation to have the only diaper changing station in the accessible stall, it would be recommended that it be located so that most of the public can use it without having to wait for the stall to be freed up.
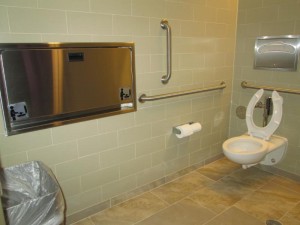
The diaper changing station in the photo above is located in the toilet compartment, but it has plenty of room after entering to have a forward approach
When locating the diaper changing station on a wall within a single user restroom, it is important to locate it so that it is not in the way of the door maneuvering clearance. The door should be able to swing clear of the diaper changing station like it is shown on the drawing below
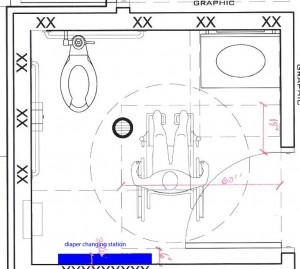
Not only do we have to be concerned about the diaper changing station when it is closed, but also when it is open. If the diaper changing station is left open and a person in a wheelchair wants to come into the restroom, they would have a hard time maneuvering through the door since there is not a clear 60″ of floor space.
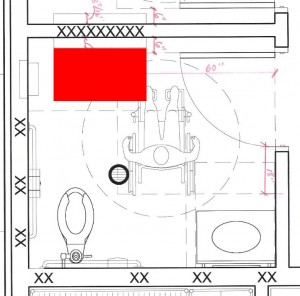
The red rectangle in the drawing above represents the open baby changing station which is in the way of the door clearance on the pull side.
Upcoming Continuing Education Opportunities
We will be presenting at the 2015 National AIA convention in Atlanta. Our class will be “Applying the ADA in Existing and altered facilities: TH118 on May 14th
Save the Date:
July 24th will be ADA Awareness day in Dallas Texas. The AIA Dallas’s Codes and Standards committee is planning a day full of great programs. Stay tuned. If you want to be a sponsor, let me know.
If you are interested in getting a Barrier Free/ADA CEU online, I partnered with Green CE. We will be presenting live webinars this year. We will post details as they become available
If you are interested in Building Code seminars check out my colleague Shahla Layendecker with SSTL Codes
If you want to learn more about these standards, be sure to check out my books:
“The ADA Companion Guide” “Applying the ADA” published by Wiley.


They are available for sale now. (also available as an e-book)
If you have any questions about these or any other topics, please feel free to contact me anytime.
Marcela Abadi Rhoads, RAS #240
Abadi Accessibility
214. 403.8714
marhoads@abadiaccess.com
www.abadiaccess.com
Useful Links
Wednesday, April 1st, 2015
The 1991 ADAAG required that all exits that served as a means of egress as defined in the IBC be accessible. the 2010 ADA Standards no longer scopes how many means of egress must be accessible, but it refers to the 2003 IBC edition or 2000 IBC edition with 2001 supplement for the accessible means of egress requirements. Typically, the IBC requires, if there is one means of egress it must be accessible. If there are two or more means of egress, then two accessible means of egress are required.
Although the ADA Standards do not have specific requirements for accessible means of egress, it references the IBC and adopts their requirements. This newsletter will explain where the IBC ends and the ADA begins when determining the means of egress requirements.
Accessible Means of Egress
An accessible means of egress, according to the IBC, is a “continuous and unobstructed way of egress travel from any point in a building or facility that provides an accessible route to an area of refuge, a horizontal exit, or a public way.
Exit access is any path from any location in a building to an exit. Although we must follow what the IBC dictates on the means of egress requirements, an exit access in the ADA cannot be less than 36″ wide. The IBC typically requires it to be wider (48″ min).
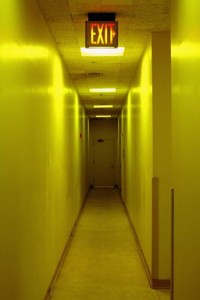
Exits include doors to the outside, enclosed exit stairways or horizontal exits. The ADA requires that doors used to pass through a space to the exit meet the guidelines of section 404. Those guidelines require maneuvering clearances, door hardware, opening force and closing speed to comply. Means of egress doors could include doors into exit stairwell, doors leading to exterior exits or doors leading to exit corridors just to name a few.
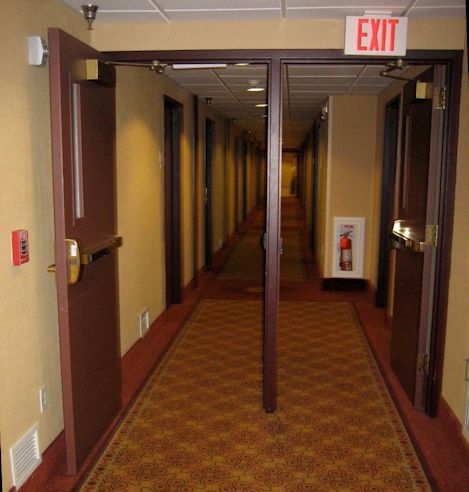
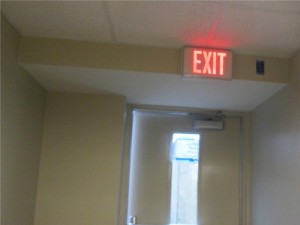
This exit door had a push side approach with both a closer and a latch. The maneuvering was a forward approach, and the door was recessed more than 8″, therefore it required a 12″ additional space on the latch side (even though it was a means of egress door).
An exit discharge is the path from an exit to a public way (i.e. street or alley). The ADA does not have guidelines directly relating to an exit discharge. Exit discharged are scoped by reference. Assisted rescue including area of refuge are not scoped in the ADA, but may be in the IBC depending on whether the building is sprinklered or not.
Means of Egress Stairs
If there are any new stairs on the exterior or interior that are part of the means of egress, they must follow the guidelines on section 504 and 505.
Whereas the IBC will focus on the number of stairs required, including the width etc, the ADA focuses on the walking surface inclusing the depth of threads and height of risers, and whether the stair treads have nosings. The ADA will also give guidelines on the handrails heights, size, shape and continuity.
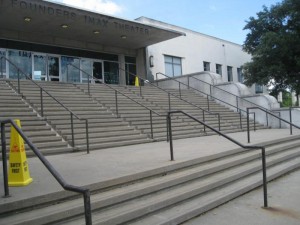
Existing stairs are excempted
Signage
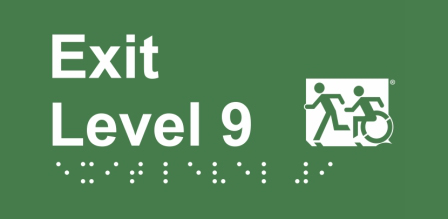
The ADA section 216.4 sets guidelines for exit doors, area of refuge, and directional signs that provide directions to accessible means of egress. These signs must not only comply with the ADA sections 703 but also the IBC sections specified in the Standards.
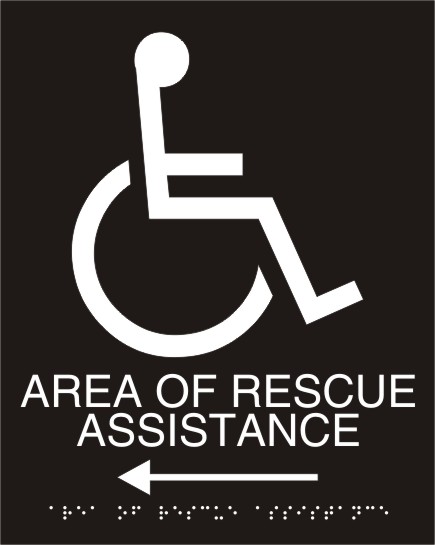
Means of egress signs should have raised characters and visual characters with a certain size, depth, case, style and proportions all found in ADA section 703.2 and 703.5 If the visual characters are accompanied by braille that complies with ADA 703.3, then the visual characters provided do not have to have a specific case, style, height, proportions, height, or spacing.
Upcoming Continuing Education Opportunities
“How Accessible is Your Work Place” By Green CE online Webinar- April 16th 3 p.m. CST
We will be presenting at the 2015 National AIA convention in Atlanta. Our class will be “Applying the ADA in Existing and altered facilities: TH118 on May 14th
If you are interested in getting a Barrier Free/ADA CEU online, I partnered with Green CE. We will be presenting live webinars this year. We will post details as they become available
If you are interested in Building Code seminars check out my colleague Shahla Layendecker with SSTL Codes
If you want to learn more about these standards, be sure to check out my books:
“The ADA Companion Guide” “Applying the ADA” published by Wiley.


They are available for sale now. (also available as an e-book)
If you have any questions about these or any other topics, please feel free to contact me anytime.
Marcela Abadi Rhoads, RAS #240
Abadi Accessibility
214. 403.8714
marhoads@abadiaccess.com
www.abadiaccess.com
Useful Links
Monday, March 2nd, 2015
In the 2010 ADA Standards, there is a section that discusses the size of the wheelchair accessible toilet compartment. But what happens if you want to make the compartment bigger? How does this affect the requirements? This newsletter will discuss the size of compartments and where the doors should be located.
If you want a bit more information on toilet compartments, I wrote about a bit more about it in my 2013 Newsletter
ADA 604.8 Toilet Compartment Doors
In a standard toilet compartment, the width of the stall must be a minimum of 60″ wide (if it has toe clearances on at least two sides).
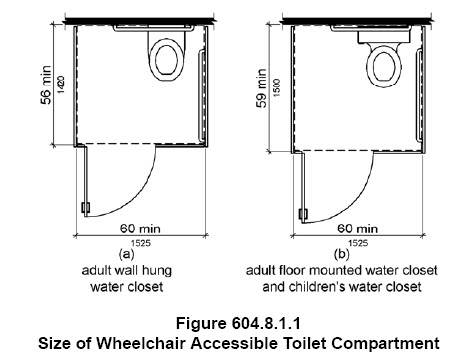
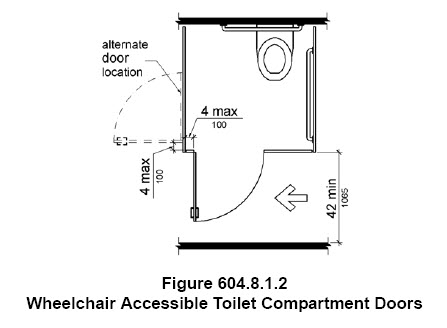
The Door in such compartments must be located a maximum of 4″ from the side partition or wall farthest from the toilet if located on the front partition.
What happens if the width of the toilet compartment is larger than 60″? Do we still have to keep the door 4″ from the side partition? Or is the sketch below allowed?
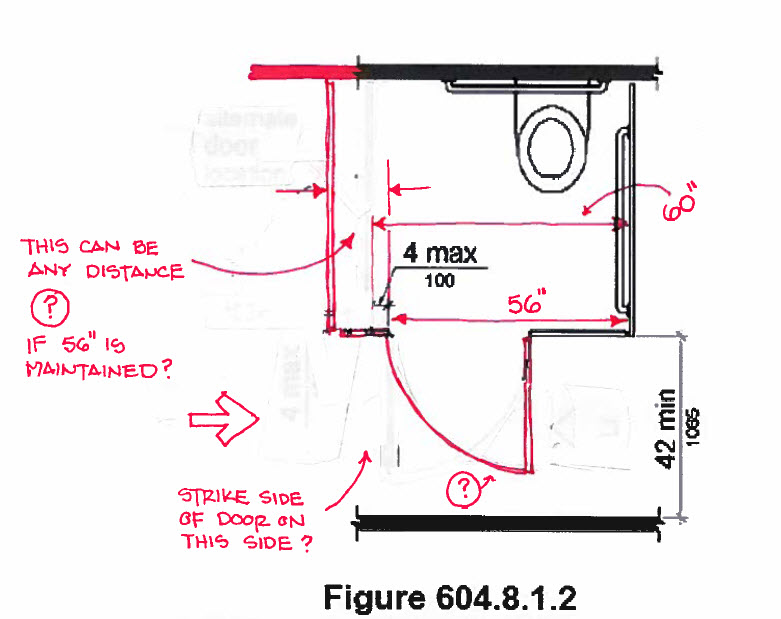
The 4″ maximum is required to ensure that the stall opening lines up with the wide side of the water closet when you have a 60″ wide stall. The 4″ can be exceed IF the stall exceeds the minimum 60″ width requirement.
Upcoming Continuing Education Opportunities
We will be presenting at the 2015 National AIA convention in Atlanta. Our class will be “Applying the ADA in Existing and altered facilities: TH118 on May 14th
If you are interested in getting a Barrier Free/ADA CEU online, I partnered with Green CE. We will be presenting live webinars this year. We will post details as they become available
If you are interested in Building Code seminars check out my colleague Shahla Layendecker with SSTL Codes
If you want to learn more about these standards, be sure to check out my books:
“The ADA Companion Guide” “Applying the ADA” published by Wiley.


They are available for sale now. (also available as an e-book)
If you have any questions about these or any other topics, please feel free to contact me anytime.
Marcela Abadi Rhoads, RAS #240
Abadi Accessibility
214. 403.8714
marhoads@abadiaccess.com
www.abadiaccess.com
Useful Links
Monday, February 2nd, 2015
The 2010 ADA introduced new scoping for operable windows. If there are operable windows in a space that will be operated by the user, at least one operable window in that space must be accessible (i.e. meet the requirements in 308 and 309)
That seems simple enough until you start specifying what type of window meets the requirements. This newsletter will try and explain the requirements and give you some suggestions on where to find windows that meet the requirements.
ADA 229: Scoping for Windows
According to section 229 of the ADA, operable windows (if provided) will have to comply with section 309 (and 308).
2010 ADA 229.1 General. Where glazed openings are provided in accessible rooms or spaces for operation by occupants, at least one opening shall comply with 309. Each glazed opening required by an administrative authority to be operable shall comply with 309.

In addition to the requirement to comply with section 309, the scoping above states, if there are operable windows in the space, at least one shall comply. But it also states that “Each glazed opening required by an administrative authority to be operable shall comply with 309.”
An example of an administrative authority that will require operable windows in spaces is The Department of Aging and Disability Services (DADS) that is in charge of long term care facilities, such as assisted living, skilled nursing and memory care facilities. DADS requires that one operable window be provided at each bedroom or sleeping room.
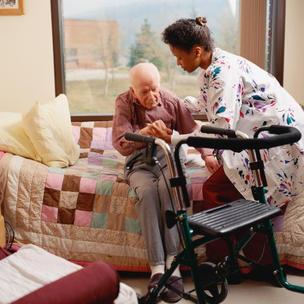
Windows that are operated by staff for work purposes are not required to comply with ADA.
Operable Parts
Section 309 requires that a clear floor space be provided at the element that requires operation. In addition, the operable part must be mounted no lower than 15″ a.f.f. and no higher than 48″ a.f.f. per ADA section 308
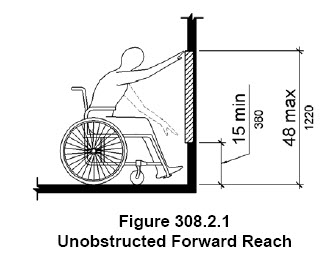
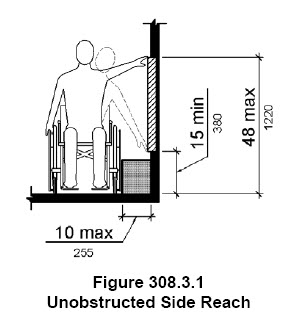
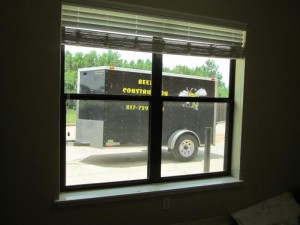
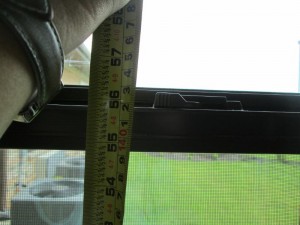
Heights to operable parts that meet the accessible reach ranges might be difficult to achieve since there are also requirements for minimum sill heights that might need to be maintained for other codes and standards. Specifying windows with operable parts that are at the bottom portion of the window might help to achieve the heights.
The third requirement of operable parts is listed below:
309.4 Operation. Operable parts shall be operable with one hand and shall not require tight grasping, pinching, or twisting of the wrist. The force required to activate operable parts shall be 5 pounds (22.2 N) maximum.
Section 309 applies to all controls and operating mechanisms, so the latch must comply with the requirement to operate with no more than five pounds of force (5 lbf). This requirement is not only to open, but to unlatch and close also.
Samples of Manufacturers that meet the requirements
Out of all the types of windows that are available for commercial use, there are only two types that are able to meet the requirements in section 309. Those are are the casement windows and awning windows

The operation is tested by the American Architectural Manufacturer Association (AAMA 513-14). Not all window manufacturers provide models that meet the reqiurements, but I was invited to a seminar where three companies presented their models:
Wausau: Aluminum casement and awnings
Graham: Aluming casement and awnings
Milgard: Vinyl awning
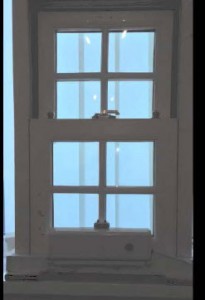
There are also after market devices that can be installed onto windows, including hung windows, which reduces the force required to open them to less than 5 lbs of operation. Some of these are:
Window Ease
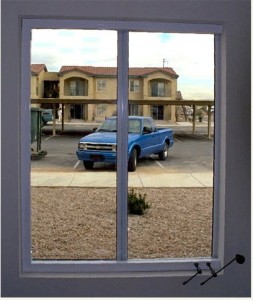
Fenstrator by Mighton: Watch this video about how it works
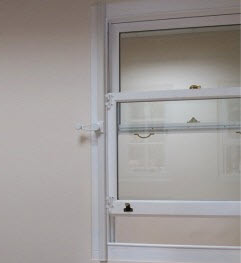
Electric sash window opener
Upcoming Continuing Education Opportunities
We will be presenting at the 2015 National AIA convention in Atlanta. Our class will be all about Existing and altered facilities.
If you are interested in getting a Barrier Free/ADA CEU online, I partnered with Green CE. We will be presenting live webinars this year. We will post details as they become available
If you are interested in Building Code seminars check out my colleague Shahla Layendecker with SSTL Codes
If you want to learn more about these standards, be sure to check out my books:
“The ADA Companion Guide” “Applying the ADA” published by Wiley.


They are available for sale now. (also available as an e-book)
If you have any questions about these or any other topics, please feel free to contact me anytime.
Marcela Abadi Rhoads, RAS #240
Abadi Accessibility
214. 403.8714
marhoads@abadiaccess.com
www.abadiaccess.com
Useful Links
Friday, January 2nd, 2015
Happy New Year 2015!
We are excited to submit our first newsletter of the year!
The 2010 ADA (and 2009 ANSI) mandates that an operable part of an accessible element must be reachable either through a forward approach or a side approach. Sometimes the Standards provide figures that can be confusing when it comes to dimensions and what the dimensions refer to. Is it the depth of the counter that we care about? Is it the operable part you are reaching to? How does an electrical outlet figure in? What are the requirements for distance of faucets and other accessories? This newsletter will clear up some of the misconceptions.
Obstructed Forward Approach Reach Range
If you must reach over an obstruction, such as a counter, a drinking fountain, or other element, using a forward approach, a knee space is required.
If a knee space is provided, and the object that you are reaching for is located no more than 20″ from the edge of the counter, the object must be mounted no higher than 48″ a.f.f. and it will be considered accessible.
If the object is located between 20″ to 25″ from the edge of the obstruction, then the element must be mounted lower, at 44″ maximum above the ground.
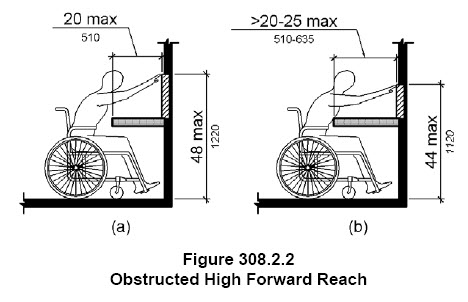
Notice that the figure DOESN’T tell us how deep a counter should be. As a matter of fact, a counter can really be as deep as you want as long as the reach range is maintained. Let’s try to take it one dimension at a time.
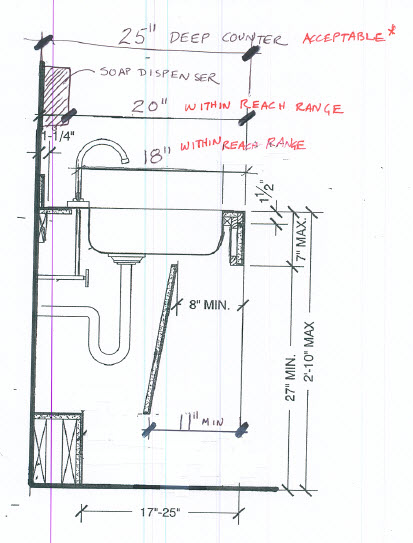
The top dimension shows that the depth of the counter is 25″. That dimension is acceptable. It would have also been acceptable if it was 26″ or deeper. The depth of the counter is NOT restricted. The distance to the object that you are reaching for IS what is restricted.
For example, the soap dispenser shown on the section is 20″ away. That distance is acceptable as long as it is mounted no higher than 48″ a.f.f.
The faucet is dimensioned as 18″ away from the edge. That distance is also acceptable according to the forward approach reach range.
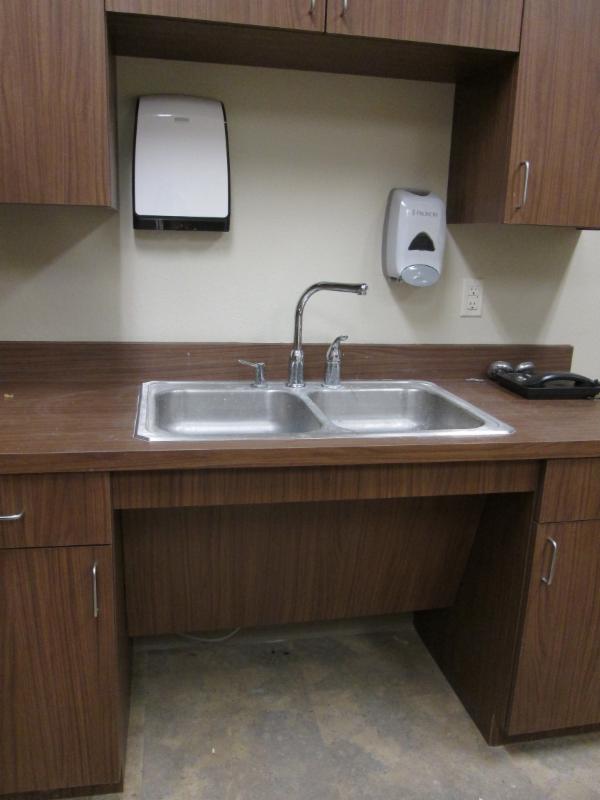
This counter shows the forward approach reach range. The soap dispenser is at an accessible height, but the paper towel is it higher than the required accessible height. Both are at the proper distance from the edge, since we count the distance to the operable part, and not the wall where they are mounted on.
Knee and Toe Clearance
For a forward approach, a knee clearance based on section 306 is required. The figures below shows the requirements. One is for the toes, which require a minimum of 17″ at the ground and an availability of a 6″ clearance beyond any pipes or panels that may be part of the cabinet.
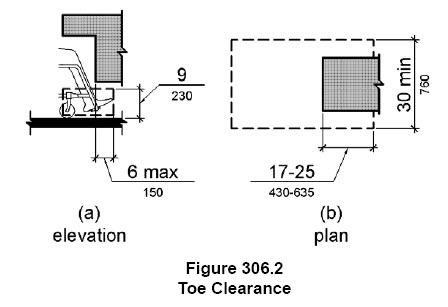
The knee space requires a minimum of 27″ of height from the ground to the bottom of the counter. It also requires a minimum of 8″ horizontal clearance at the top and a minimum of 11″ plus the additional 6″ for toe clearance (17″ min.) at the ground.
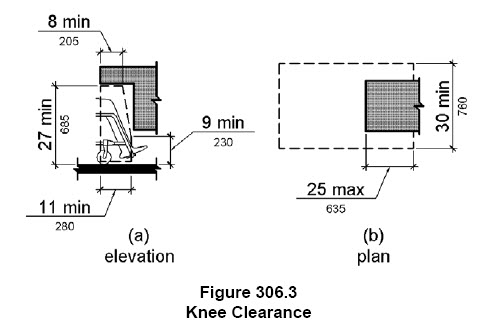
The section below shows a drawing from a designer, and I will explain what is commonly misunderstood

A 17″ minimum clear floor space must be provided measured from the edge of the counter to any obstruction beyond the edge. Just keep in mind that the first 11″ of that required clear floor space is considered knee clearance. The next 6″ only is considered toe clearance. Since only 6″ out of the 17″ clearance will be considered toe clearance, any more than that is not relevant.
Obstructed side approach reach range
A Side approach reach range is more restrictive than a forward approach. For one thing, the height of the obstruction MUST only be 34″ a.f.f. A taller counter cannot be used if a side approach reach range is required.
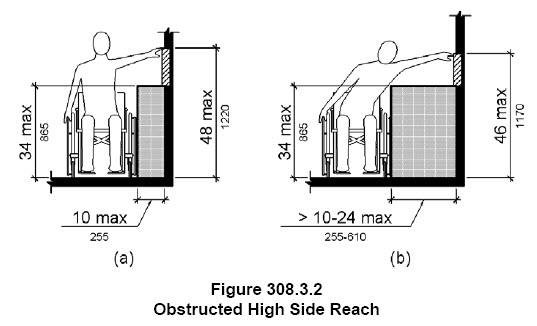
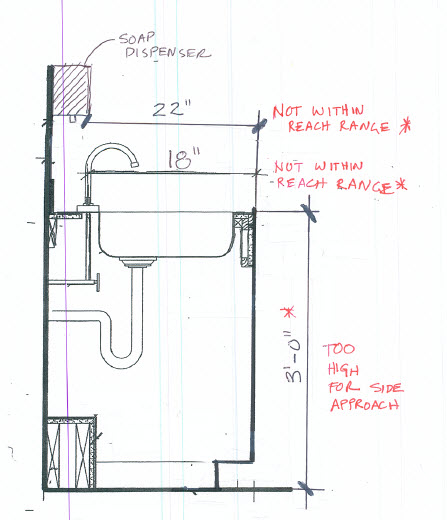
This section shows a 3′-0″ tall counter. No matter how low the soap dispenser is or even how close the faucet is from the edge, these cannot be reached from the side. There is one EXCEPTION. If the distance from the edge to the element is no more than 10″ away, then it is not considered an obstruction and it can be mounted on a counter higher than 34″ a.f.f.
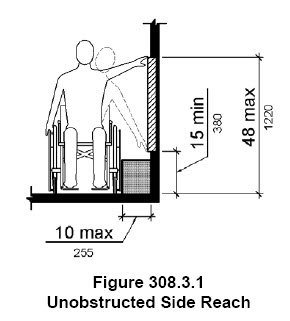
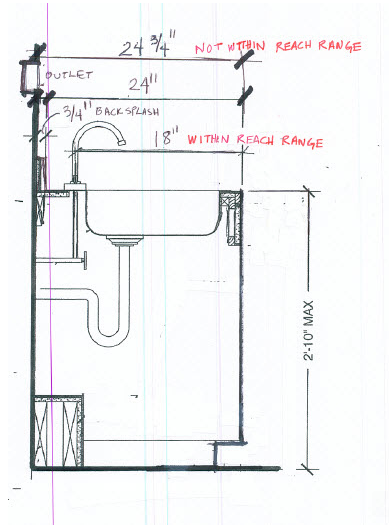
If you do have a counter that is 34″ a.f.f. ,you may use the side approach reach ranges. The section below shows you the acceptable ranges. Notice one of the dimensions is correct. The faucet is within the side approach reach range. But sometimes an outlet is located on the back of the wall beyond the back splash. If the counter is 24″ deep and the back splash is 3/4″, then the outlet mounted on the back wall will be 24 3/4″ away from the edge. This is beyond the allowable reach range for a side approach.
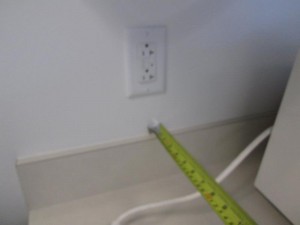
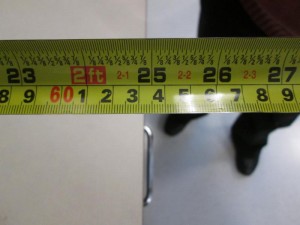
The outlet behind the counter was located 25″ away from the edge
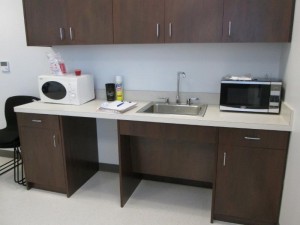
There are two outlets in this break room and one could be reached on the side of the counter.
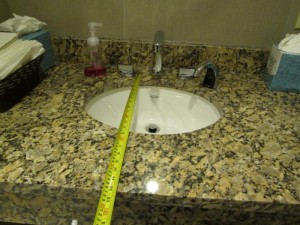
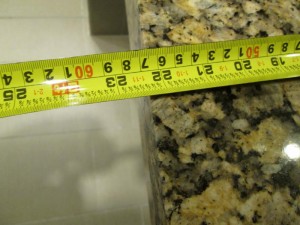
The faucet in this sink was located 22″ away from the edge which is within reach range
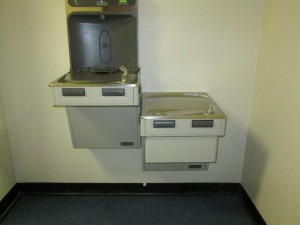
This type of drinking fountain has a bottle filler mechanism. If it is located at the high drinking fountain with an open knee space, it can be reached using a forward approach reach range since the height of the obstruction is not an issue. The only requirement is that the sensor be located no farther than 25″ away and no higher than 48″ a.f.f.
This one complied.
Happy New Year!
we look forward to serving you in 2015! Let us know if there is anything we can do to make the standards a little easier to understand.
If you are interested in getting a Barrier Free/ADA CEU online, I partnered with Green CE
If you are interested in Building Code seminars check out my colleague Shahla Layendecker with SSTL Codes
If you want to learn more about these standards, be sure to check out my books:
“The ADA Companion Guide” “Applying the ADA” published by Wiley.
They are available for sale now. (also available as an e-book)
If you have any questions about these or any other topics, please feel free to contact me anytime.
Marcela Abadi Rhoads, RAS #240
Abadi Accessibility
214. 403.8714
marhoads@abadiaccess.com
www.abadiaccess.com
Useful Links
Wednesday, December 24th, 2014
As an accessibility consultant I perform inspections in completed projects. I find mistakes in construction that could have been avoided if the Standards were understood a bit better. This newsletter will show a few violations that happen often.
ADA 904.5.1 Self-Service Shelves and Dispensing Devices
Convenience stores or concession stands where self service counters are located can be confusing. Because most of the time, the Americans with Disabilities Act Design Guidelines has requirements for permanently fixed elements, a beverage dispenser is overlooked. Even though it is a piece of equipment, it is still required to comply. 904.5.1 Self-Service Shelves and Dispensing Devices states:
“Self-service shelves and dispensing devices for tableware, dishware, condiments, food and beverages shall comply with 308″.
Section 308 discusses reach ranges. Items on a self service beverage counter at a convenience store, restaurant or concession stand will have to be within reach range. Notice that the section does not require that the “fixed” counter be at a certain height, but that the dispensers etc. be within reach range. Therefore at times the counter may have to be lower than the accessible height we are accustomed to (34″ a.f.f. or 36″ a.f.f. max) in order to achieve the height required for the equipment. It is important to communicate with the dispenser vendor to find out the specs on the equipment in order for us to design/build the proper height counter.
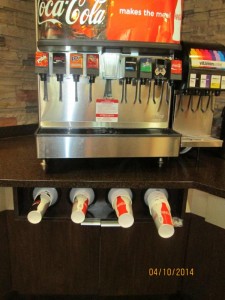
This beverage dispenser had the operating mechanism higher than the required 48″ a.f.f.
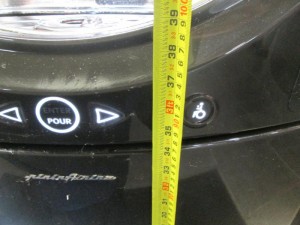
This dispenser has a separate lower dispensing button that is within reach range
ADA 404.2.4 Maneuvering Clearance at doors
Section 404 describes the requirements to allow persons with disabilities to open doors independently. Depending on the approach to the door (pull side vs. push side; latch side vs. hinge side), there are minimum clearances required at the door. For example, when you have a forward approach on the pull side of the door, 18″ minimum at the latch side of the door is required. Many times that clearance is obstructed by either an element mounted adjacent the door, or a wall built too close.

This photo shows a set of cubbies next to the pull side of the door which encroaches on the 18″ min. required clearance
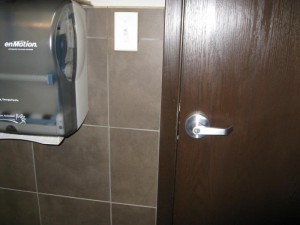
This photo shows a paper towel dispenser that is mounted next to the latch side. If the paper towel dispenser was less than 8″ this would be considered a recessed door and it would allow to encroach on the clearance.
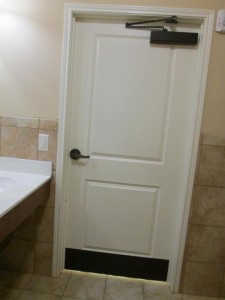
PHOTO A
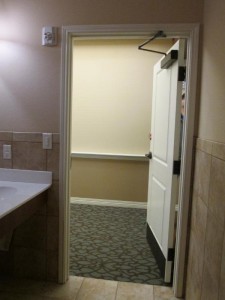
PHOTO B
The two photos above (“PHOTO A” and ” PHOTO B”) shows a push side approach. This door has both a closer and a latch which requires a maneuvering clearance of 12″ on the latch side of the door. There is a lavatory next to the latch which prevents the 12″ min. to be provided.
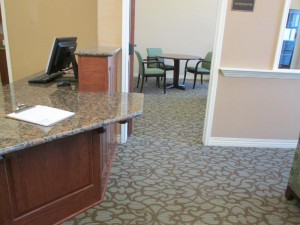
This photo show a granite counter that is in the way of the forward approach to the door
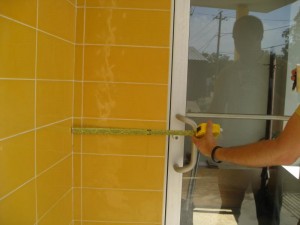
“PHOTO C”
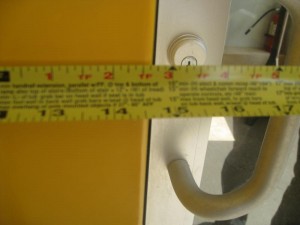
“PHOTO D”
The two photos above shows that the door was installed too close to the side wall and there is no 18″ min. on the pull side provided
305 Clear Floor or Ground Spaces
Section 309 speaks about operable parts of elements. If there are elements that are provided with an operating mechanism, then a clear floor space that meets the requirements of Section 305 should be provided. Section 305 describes that a clear floor or ground space that is 30″x48″ space be provided at the operating mechanism.
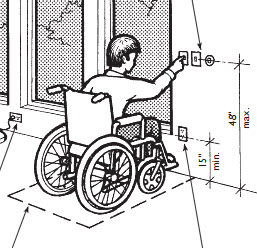
The clear floor space should be unbstructed and have a slope less than 2% (1:48) so that a person in a wheelchair can reach the mechanism without rolling away from the element.
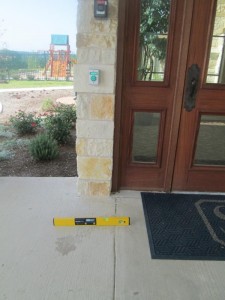
This push button mechanism is located where there is a slope steeper than 2%
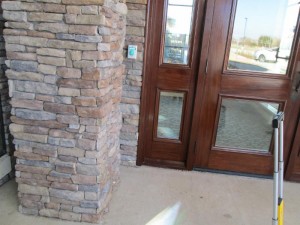
The push button on this wall has a column in the way of the clear floor space. Although the clear floor space does not need to be centered o the operating mechanism, the column makes it difficult to approach the element.
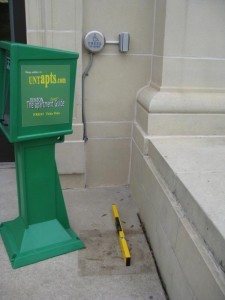
The door opener in this photo shows a newspaper stand in the way of the clear floor space that prevents a person from reaching the button
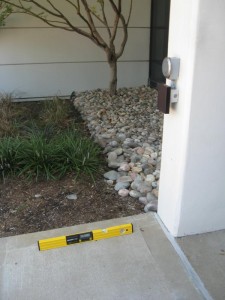
The photo above shows a door opener mounted so that the clear floor space is located at a sloped surface steeper than 2%
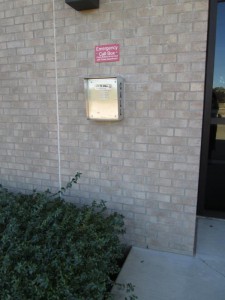
The photo above shows an emergency phone that is located above the landscaped area rather than the ground surface.
Upcoming CEU opportunities
Thank you for a wonderful 2014! We look forward to serving you again in 2015!
If you are interested in Building Code seminars check out my colleague Shahla Layendecker with SSTL Codes
We are celebrating our 10th year of service to the building industry as a Registered Accessibility Specialist! Mention this newsletter and receive 10% off your next review or inspection.
If you want to learn more about these standards, be sure to check out my books:
“The ADA Companion Guide” “Applying the ADA” published by Wiley.


They are available for sale now. (also available as an e-book)
If you have any questions about these or any other topics, please feel free to contact me anytime.
Marcela Abadi Rhoads, RAS #240
Abadi Accessibility
214. 403.8714
marhoads@abadiaccess.com
www.abadiaccess.com
Useful Links
Monday, November 24th, 2014
When spec writers, architects or even builders specify products there might be some confusion about what products are actually good for people with disabilities. Sometimes the cut sheets will have the universal symbol of design, but they may not exactly be accessible. Other times there might be so many choices that it can get confusing. This newsletter will attempt to give you some general guidelines on what to look for when specifying.
302 Floor and Ground Surfaces
Accessible ground and floor surfaces must be firm, stable and slip resistant. This is typically achieved by specifying a product with a high static coefficient of friction (specific number is not specified anymore, but good as a guideline).
There are several products that might be good for LEED that will not be good for accessibility. One example is decomposed granite. In essesce, DG is a type of gravel that is loose. It is not considered stable unless you use stabilizers. The DG must be maintained in order to keep it stable. If the ground gets wet the decomposed granite will be muddy and no longer stable. I don’t recommend this surface. If possible, don’t use it on accessible routes or parking, and try to limit it to non-walking surfaces

The photo above shows wheel marks where the decomposed granite is not stable and therefore not easy for people who use wheelchairs to use
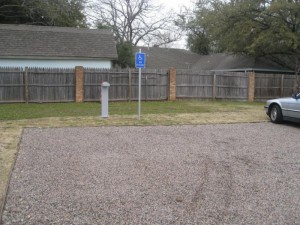
Parking spaces must also have a stable ground surface, and decomposed granite for parking spaces are not recommended
BEWARE OF CUT SHEETS!
Cut sheets for different products will sometimes show the universal symbol of accessibility on them.
The symbol is not regulated and anyone can place it on any product without actually being endorsed or reviewed by the DOJ or ADA agencies. So be careful when specifying products solely on the symbol being placed on the cut sheet. Here are some examples:
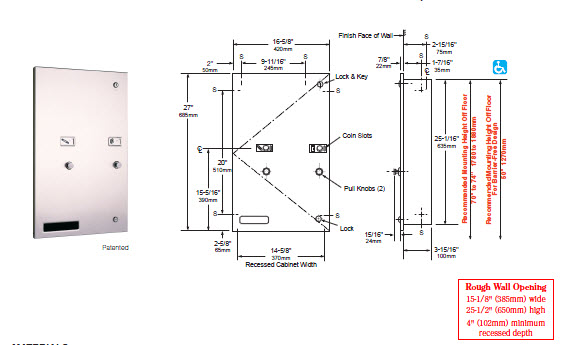
This feminine napkin dispenser has the symbol shown on the cut sheet and states that if mounted at a height no higher than 48″ a.f.f. to the operating mechanism that it would comply with the ADA standards. What they did not tell you is that the operating mechanism itself was not compliant. In order for it to be compliant, it will require no tight grasping and pulling to operate. This unit requires tight grasping and pulling.
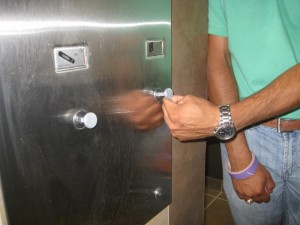
This is the unit installed which a person with disabilities may not be able to use
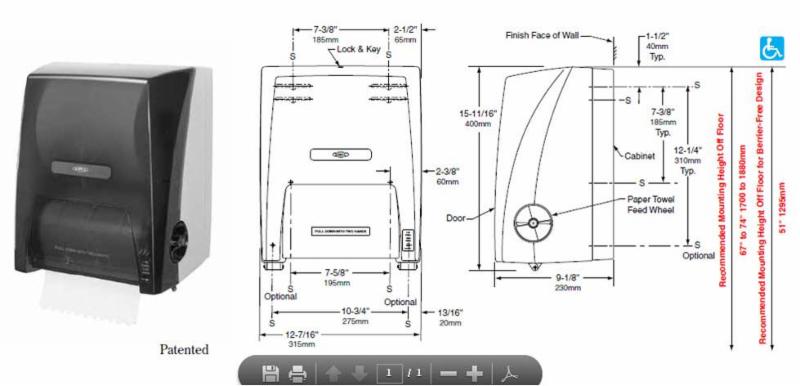
This paper towel dispenser in the cut sheet shown below also shows the universal symbol of accessibility, stating a similar claim that if mounted at a certain height, it will meet the ADA requirements. This unit also did not take into consideration the operating mechanism. Not only does the paper towels need to be tightly grasped and pulled to use, but if the paper is not out, the user will have to twist the red wheel by using their wrist to make the paper come out.
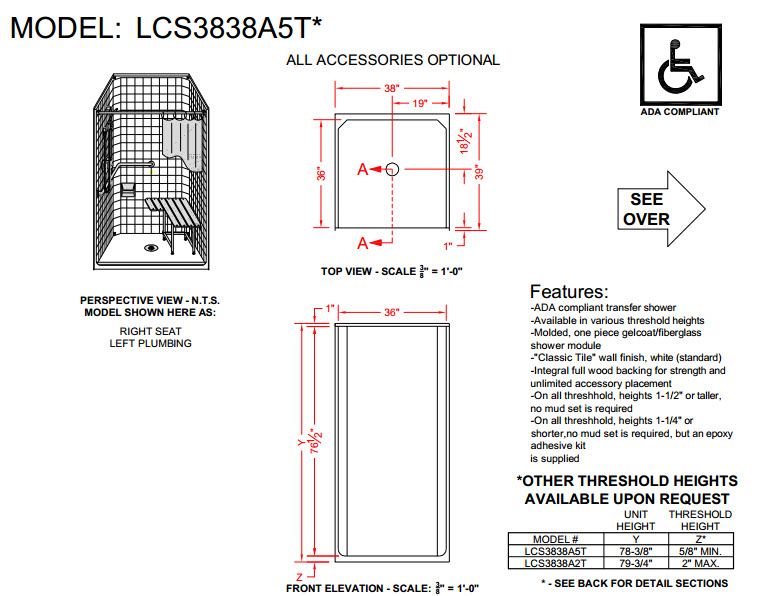
Pre-fab showers sometimes have incorrect information on their spec/cut sheets. The height of the curb for either roll in or transfer shower must not be higher than 1/2″. The shower shown below states that it is ADA compliant, but if you notice the dimension on the threshold it states that it is either 5/8″ or 2″,which are not compliant
309 Operating Mechanism
ADA section 309 states that “operable parts shall be operable with one hand and shall not require tight grasping, pinching, or twisting of the wrist. The force required to activate operable parts shall be 5 pounds (22.2 N) maximum.”
5% of lockers must have the proper operating mechanism. Built in locks that require tight grasping and twisting of the wrist is not compliant.

The lockers shown above have the built in lock that requires twisting of the wrist to operate and it is not compliant with ADA guidelines
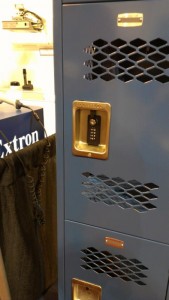
This locker shows a push button locking mechanism which is better for accessibility
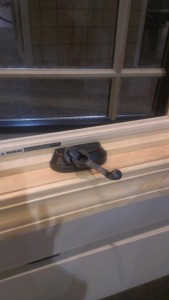
One operable window per room or space must be accessible and follow section 309. They must be able to be opened without twisting of the wrist or more than five pounds of opening force. The handle on the picture above can be opened with a closed fist.
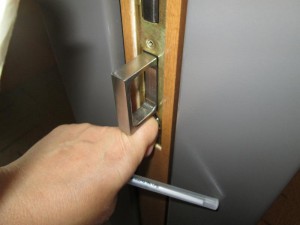
Pocket doors are hard to open without using your hands. This operating mechanism is a good solution which opens up with using knuckles to release the handle
Upcoming CEU opportunities
Note: We will be at the TSA convention November 5,6 and 7
November 6- TSA Convention in Houston Texas! Early Bird Three Hr Seminar: Applying TAS in Existing and Renovated Buildings”
November 13- Half Moon Class: Complying with Changes to Barrier Free Requirements: Determining which code applies to your project 10:45 a.m. Arlington Texas
November 13- CSI Dallas Meeting : Specifying for the ADA 7-8 p.m. in Addison Texas
If you are interested in Building Code seminars check out my colleague Shahla Layendecker with SSTL Codes
We are celebrating our 10th year of service to the building industry as a Registered Accessibility Specialist! Mention this newsletter and receive 10% off your next review or inspection.
If you want to learn more about these standards, be sure to check out my books:
“The ADA Companion Guide” “Applying the ADA” published by Wiley.

They are available for sale now. (also available as an e-book)
If you have any questions about these or any other topics, please feel free to contact me anytime.
If you have any questions about these or any other topics, please feel free to contact me anytime.
Marcela Abadi Rhoads, RAS #240
Abadi Accessibility
214. 403.8714
marhoads@abadiaccess.com
www.abadiaccess.com
Useful Links
Friday, October 24th, 2014
One of the first things that come to mind when designing for accessibility are grab bars. But even though most of us know how to design with them, there are a few subtle things that are missed often. This newsletter will explain some of the rules that people may not be aware of pertaining to grab bars.
Toilet Grab Bars
The rear wall grab bar should always be 36″ min. (unless there is an exception per section 604) and it should be located so that the first 12″ min is centered with the toilet.
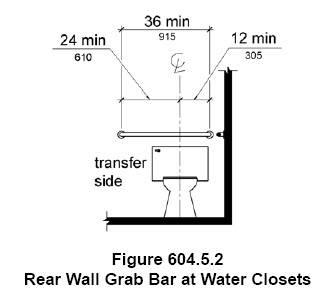
Does that mean that a continuous grab bar cannot be used anymore since the first 12″ must be centered with the toilet?

Yes you can! The provision at 604.5 states that the grab bar must be 12 inches “minimum” from the center line of the toilet, so it is allowed to be more than 12″ and can be placed as close to the wall as possible. Increasing the 12″ dimension would require using a grab bar longer than 36″ inches as the 24″ inches on the other side of the toilet is also a minimum.
Shower Grab Bars
Accessible showers require grab bars at all walls unless the shower has a seat. There is one confusing item in the roll in shower that I noticed while I was doing inspections that was being missed. That requirement is that grab bars should be located 6″ maximum from the side walls.

This is not typically an issue except when the roll in shower is larger than 5′-0″. If the shower is 5′-0″ and you take away 12″ on the back wall (6″ on each side), the grab bar should be no smaller than 48″. But if the shower is larger than 5′-0″, the back wall grab bar will have to be longer accordingly.
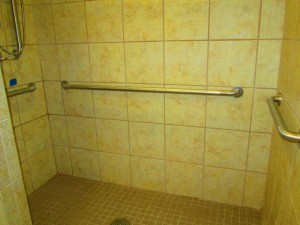
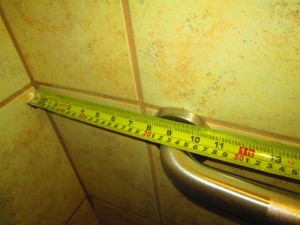
This shower was larger than 5′-0″ but the grab bar was more than 6″ away from the side walls
Objects above and below grab bars
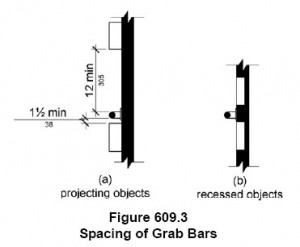
Objects like toilet paper dispensers and shelves are allowed to located above or below the grab bars. But these objects must be mounted in order that they will not prevent someone from being able to use the grab bar. If there is an object mounted above the grab bar, it should be mounted 12″ above the top of the grab bar. And if there is an object located below the grab bar, it must be mounted 1 1/2″ below the bottom of the grab bar in order for a person to put their hand all the way around the bar.
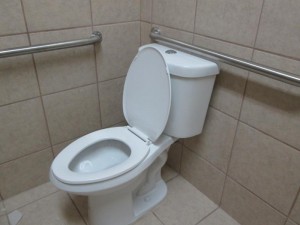
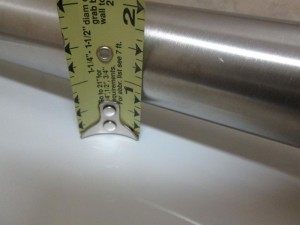
The tank of this toilet is less than 1 1/2″ away from the bottom of the grab bar.

The shelf above the grab bar is less than 12″ away from the top of the grab bar.
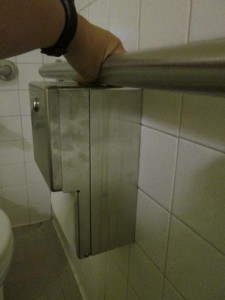
This toilet paper dispenser is too close to the grab bar and it does not allow a person to utilize it properly.
Upcoming CEU opportunities
Note: We will be closed on October 9th, 10th, 16th and 17th
November 6- TSA Convention in Houston Texas! Early Bird Three Hr Seminar: Applying TAS in Existing and Renovated Buildings”
November 13- Half Moon Class 10:45 a.m.
November 13- CSI Dallas Meeting 7-8 p.m.
We are celebrating our 10th year of service to the building industry as a Registered Accessibility Specialist! Mention this newsletter and receive 10% off your next review or inspection.
If you want to learn more about these standards, be sure to check out my books:
“The ADA Companion Guide”
“Applying the ADA” published by Wiley.
They are available for sale now. (also available as an e-book)
If you have any questions about these or any other topics, please feel free to contact me anytime.
Marcela Abadi Rhoads, RAS #240
Abadi Accessibility
214. 403.8714
marhoads@abadiaccess.com
www.abadiaccess.com
Useful Links


 Abadi
Abadi 


